
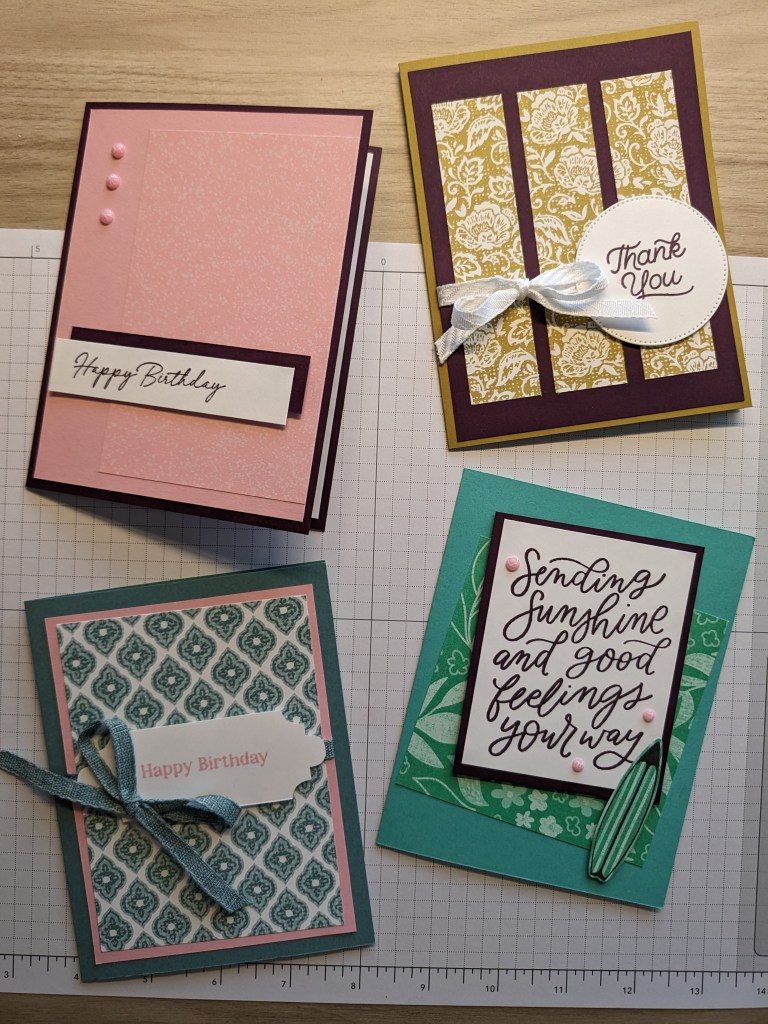
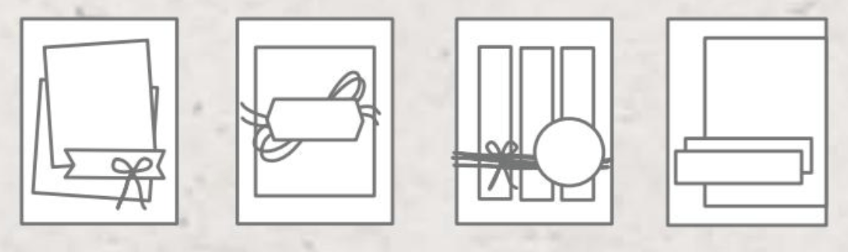
I wanted to practice my design skills, so I started in the simplest way possible: I used the sketches from the Stampin’ Up! 2024 Annual Catalog. You can find these sketches on page 22 and follow along with me on the first four here below.
Materials Used
Each card in this set inspired the one before it somehow. This is not intended to be a cohesive set, per se; but you could design it that way if you’d like. That’s the beauty of sketches: They give you a frame and you get to make whatever you want from there!
- Primary Colors: Blackberry Bliss, Lost Lagoon, Pretty in Pink, Shy Shamrock, Summer Splash, Wild Wheat
- DSP: 2024 In Color DSP, Lily Pond Lane, Poetic Expressions
- Card Stock: Basic White, Blackberry Bliss, Lost Lagoon, Pretty in Pink, Summer Splash, Wild Wheat
- Primary Stamp Sets: Charming Duck Pond, Good Feelings, Magnolia Mood
- Optional Stamp Sets: Beach Day, Circle Sayings
As usual, my creativity got ahead of me, so I used a more eclectic mix of products than others might have. Want to make a cohesive set? Pick two to three colors and one set of DSP and stamps.
Detailed Instructions
Here are all the steps I took making the first four cards from the sketches in this year’s catalog. As usual, you can jump straight to the list of materials and measurements here: Measurements and Supplies
Before diving in, please note: All cards in this series use an 8 1/2″ x 5 1/2″ card base scored at 4 1/4″ and a 4″ x 5 1/4″ white insert.
Sending Sunshine
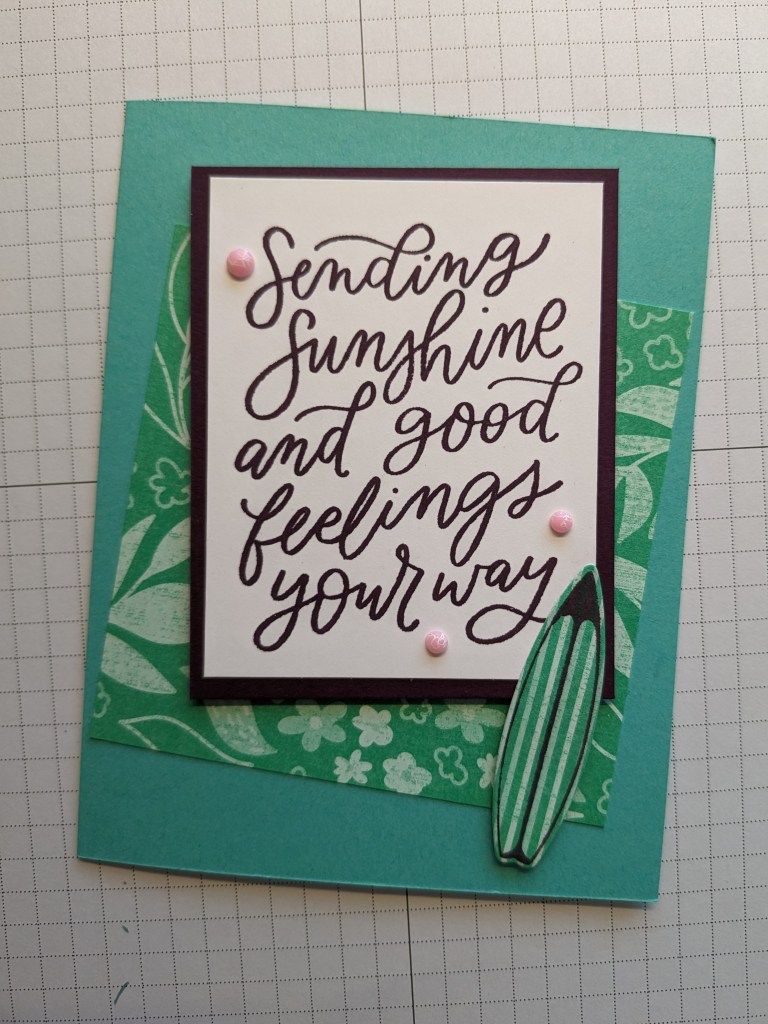
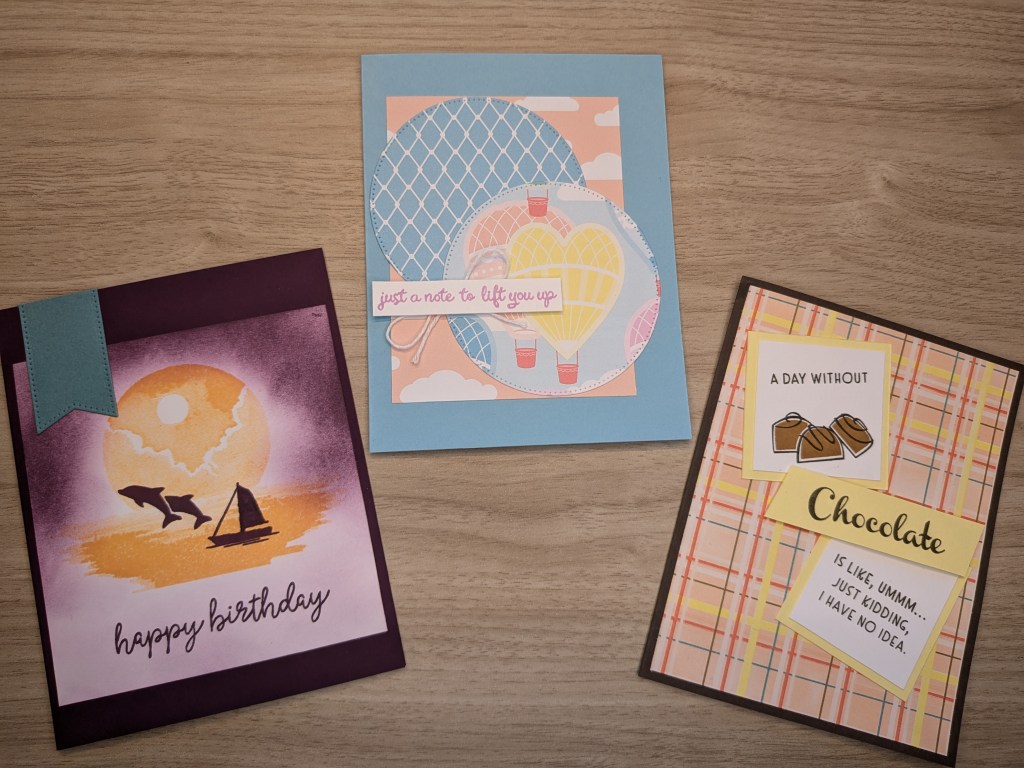
I followed the sketches in order and decided on two criteria to start my design on the first one: use this year’s new green, Shy Shamrock, and use the Good Feelings stamp set, which works perfectly for the large focal point in this sketch.
I decided to use Shy Shamrock for the first layer, using the floral pattern from the 2024 In Color DSP set. I cut this layer as a 3 3/4″ square and glued it to a Lost Lagoon card base. For a pop of contrast, I chose Blackberry Bliss to matte the sentiment layer, measuring 3″ x 3 3/4″ and 2 3/4″ x 3 1/2″, respectively.
This is where I diverged from the sketch. You can too! Instead of the banner and bow in the sketch, I decided to add a cut out embellishment to complement my large sentiment. I love the little surfboard from the Beach Day set, but you could use any flower, character, or prop you might have. Have fun with it!
Since I had the Beach Day set out, I stamped “happy birthday” and a little beach ball on the inside in Blackberry Bliss. By the way, if you’re wondering about the stripes on the surfboard, that’s the back of the floral DSP!
Happy Birthday 1

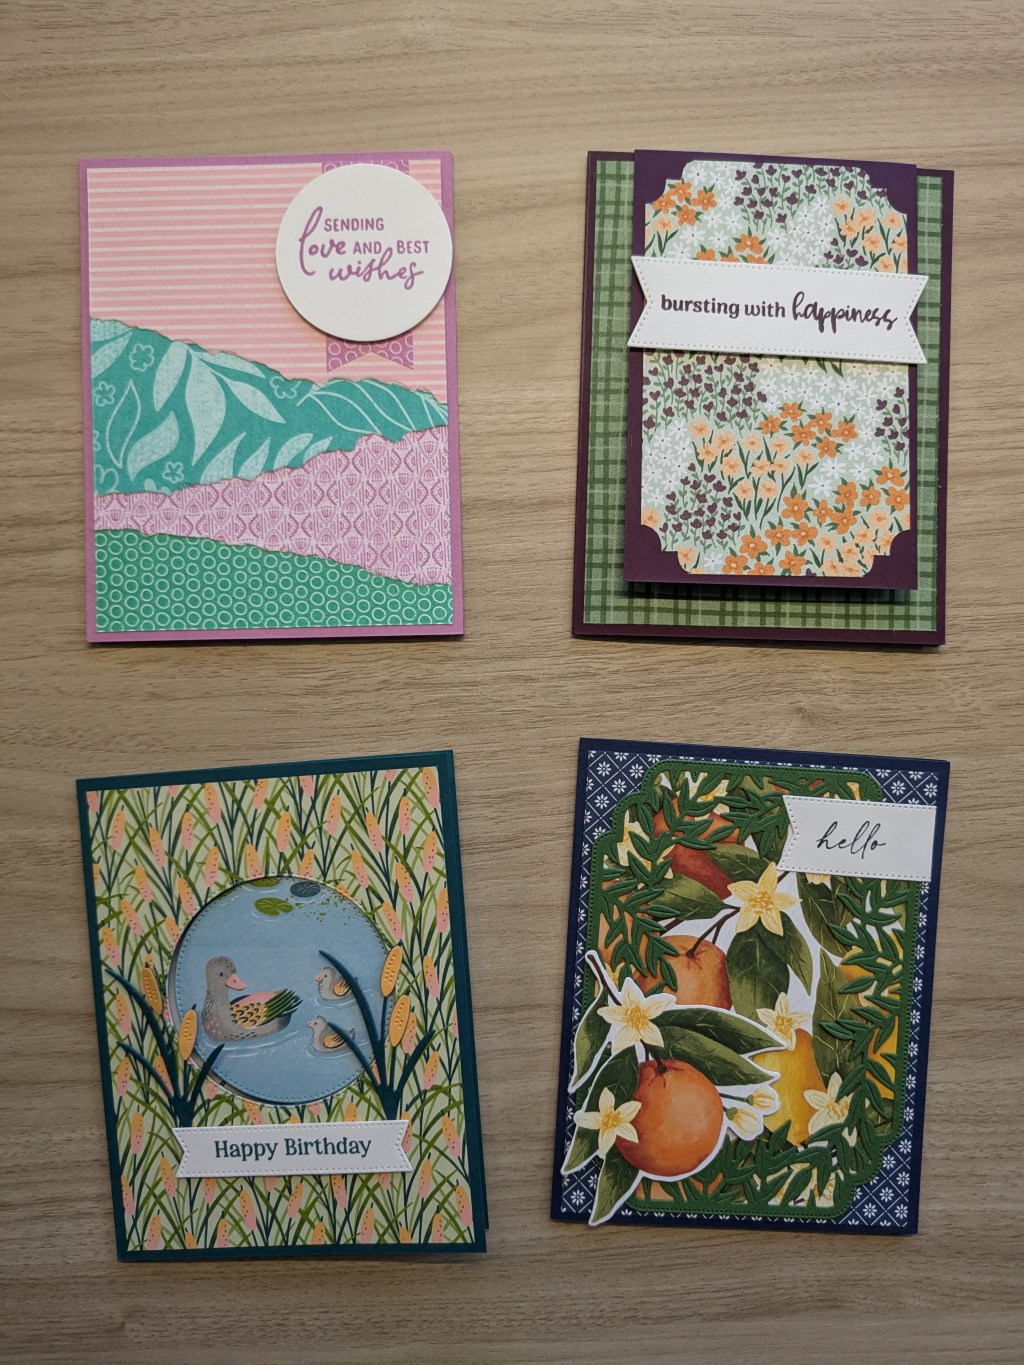
I loved using the new colors in the first card, so I chose to keep that going in the second. My favorite, by far, is Pretty in Pink, so that’s where I started. Looking at the sketch, the large bow and angular sentiment felt romantic to me, so I dove into Poetic Expressions DSP. I didn’t have many suitable options in pink, so I chose a coordinating color to go with it: Lost Lagoon.
Suddenly, this became a Lost Lagoon card. I used it for the card base, DSP, and ribbon with only a splash of my new favorite color. Oh well. I made up for that in the fourth card. Anyway, the pink layer is 3 3/4″ x 5″, exposing more of the card base, like in the sketch, and the DSP layer is 3 1/2″ x 4 3/4″.
I don’t feel confident hand cutting sentiment layers, so I turned to a corner punch for this one. It measures 3 1/2″ x 1 1/4″, spanning the full width of the DSP layer. The cut out corners lets the DSP still shine, though. If you’d rather cut by hand, you could use points, like in the sketch, or use any shape you want.
Despite the strikingly different motif, the sentiments in the Charming Duck Pond stamp set go beautifully with the Poetic Expressions DSP. I used “happy birthday” for the tag on the front and “have a lovely day” with a monochrome spray of foliage from the same set on the inside.
One major variance between my design and the sketch is that I put my ribbon on the front of my sentiment rather than behind it. I tried to match the sketch, but since I only have ribbon (no string or twine here), the knot stuck out, even with the sentiment layer popped up with Dimensionals. Hence, the huge bow on top.
Thank You

OK, confession time. I broke two of my rules with this card. I wanted this series to be simple and accessible, so I told myself not to use dies or retired products. Well, that sentiment layer is me, red-handed. In truth, you could use any stamp set for this sketch and a punch for the circle. Don’t have a punch? Try a diamond shape instead: Just cut out a square and turn it 45 degrees.
Here’s where I started pulling in supplies from the other cards. The Blackberry Bliss layer (4″ x 5 1/4″) is scrap from the first card and the DSP panels (1″ x 4 1/4″ times three) are from back side of the Poetic Expressions DSP. I chose a Wild Wheat card base to go with the DSP and white ribbon to go with the sentiment. In case you already have the retired set, the front and inside sentiments are from the Circle Sayings set: “thank you” and “because you’re awesome”
Happy Birthday 2
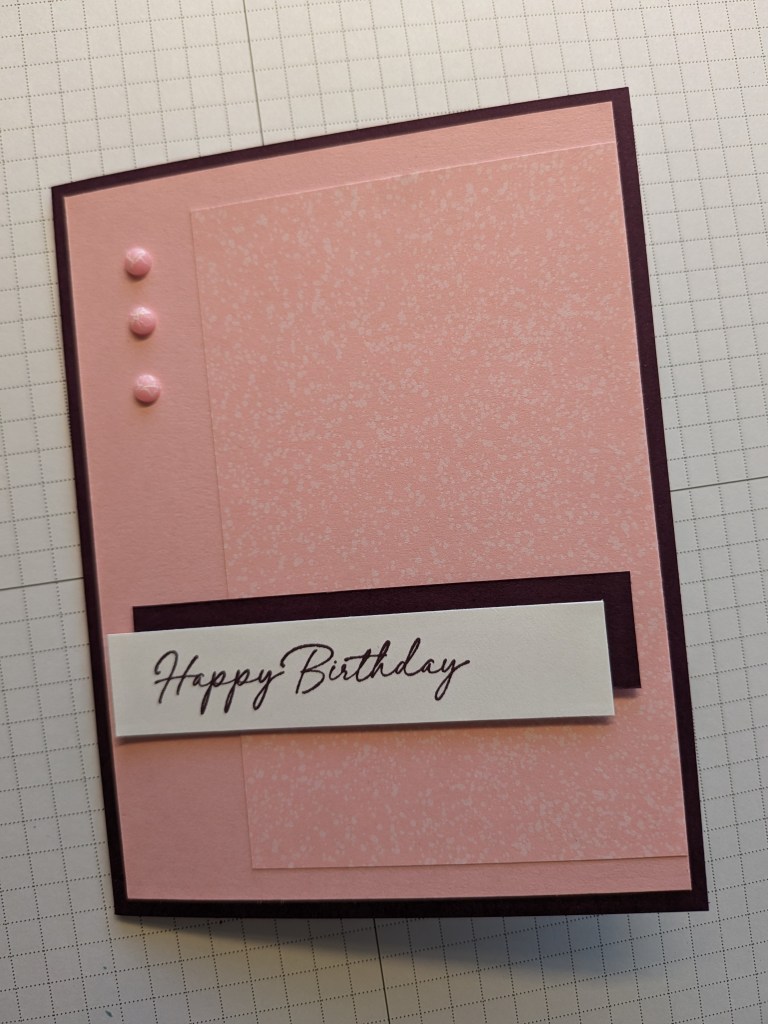
Quiz time! What’s my favorite Stampin’ Up! color? If you guessed Pretty in Pink, you’re right. This charming pink finally gets to shine with sentiments from my favorite stamp set, Magnolia Mood. The DSP? That comes from the Lily Pond Lane set, which you can get bundled with the Charming Duck Pond set I used above. Oh, and the cracked pink embellishments from this card and the first one came from the same bundle. Nice!
The background in this sketch just screamed monochrome to me while the rest of the sketch screamed duochrome. The solid Pretty in Pink layer is 4″ x 5 1/4″ and the offset DSP layer provides the slightest contrast at 3″ x 4 3/4″.
I had a 3 1/2″ x 3/4″ scrap of Blackberry Bliss from the first and third cards, so I used it for the background layer on my sentiment. I matched the card base to that color and cut the white sentiment layer to the same size. I stamped “happy birthday” from Magnolia Mood on that layer and, inside, I stamped “just a note to let you know that you are loved” from the same set.
What’s Next
So… my design skills still need some work. I was pleased with these cards, but I’m going to try to stick within a few more parameters in the next round. Next time, look forward to the next four sketches presented as a cohesive set made as simply as possible…and all in current products.
Measurements and Supplies
Whether you read my narrative instructions or jumped here from the intro, you’re in the right place! Here’s a quick reference of measurements for all four cards.
The Cards
Sending Sunshine and good feelings your way
- Card base: Summer Splash, 8 1/2″ x 5 1/2″, scored at 4 1/4″
- Layer 1: 2024 In Color DSP, 3 3/4″ square
- Layer 2: Blackberry Bliss card stock, 3″ x 3 3/4″
- Sentiment layer: Basic White card stock, 2 3/4″ x 3 1/2″
- Interior panel: Basic White card stock, 4″ x 5 1/4″
happy birthday 1
- Card base: Lost Lagoon, 8 1/2″ x 5 1/2″, scored at 4 1/4″
- Layer 1: Pretty in Pink card stock, 3 3/4″ x 5″
- Layer 2: Poetic Expressions DSP, 3 1/2″ x 4 3/4″
- Sentiment layer: Basic White card stock, 3 1/2″ x 1 1/4″, trimmed to shape by hand or with a punch
- Ribbon: Lost Lagoon
- Interior panel: Basic White, 4″ x 5 1/4″
Thank You
- Card base: Wild Wheat, 8 1/2″ x 5 1/2″, scored at 4 1/4″
- Layer 1: Blackberry Bliss card stock, 4″ x 5 1/4″
- Layer 2: Country Woods DSP (3), 1″ x 4 1/4″
- Sentiment layer: Basic White card stock, 2 1/8″ circle
- Interior panel: Basic White card stock, 4″ x 5 1/4″
Happy Birthday 2
- Card base: Blackberry Bliss, 8 1/2″ x 5 1/2″, scored at 4 1/4″
- Layer 1: Pretty in Pink card stock, 4″ x 5 1/4″
- Layer 2: Lily Pond Lane DSP, 3″ x 4 3/4″
- Popped layer: Blackberry Bliss card stock, 3 1/2″ x 3/4″
- Sentiment layer: Basic White card stock, 3 1/2″ x 3/4″
- Interior panel: Basic White card stock, 4″ x 5 1/4″
Thanks for making these with me. Check back again for more tutorials on Handmade by Lily McKay.


Leave a comment