

I’ve been making card sets lately. It started as an experiment with Stampin’ Up’s new 2024 In Colors, then it evolved into an extended Mother’s Day project in which I made sets for my mom, my MIL, my friend who’s a mom, and her mom. All these sets used other crafters’ designs, though. My Country Lace set is the first one I designed entirely on my own, so I’m proud to share it here as my first Handmade by Lily McKay blog post.
Materials Used
I tried to use a limited range of materials for this set, originally challenging myself to simply find a use for my Country Woods DSP. Things expanded a bit, though; but I think the aesthetic remained clean and coherent.
- Primary Colors: Misty Moonlight, Petal Pink
- DSP: Country Lace, Country Woods
- Card Stock: Misty Moonlight, Petal Pink, Very Vanilla
- Primary Stamp Set: Perennial Postage
- Optional Stamp Sets: Beach Day, Detailed Dogwood
- Dies: Deckled Circles, Scalloped Contours, Stylish Shapes
You could easily make a set with just one each of DSP, stamps, and dies. My creativity just got the better of me!
Detailed Instructions
Here are all the steps I took making this set. If you’d rather just work off the pictures and a list of materials/measurements, see Measurements and Supplies below.
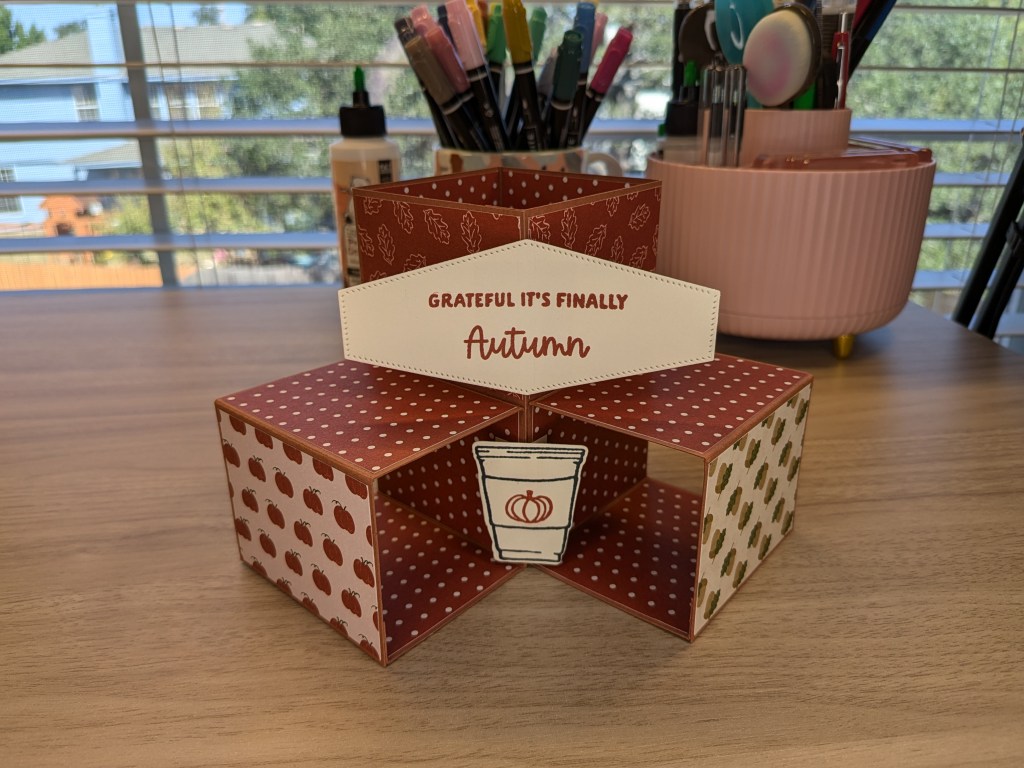
The Box
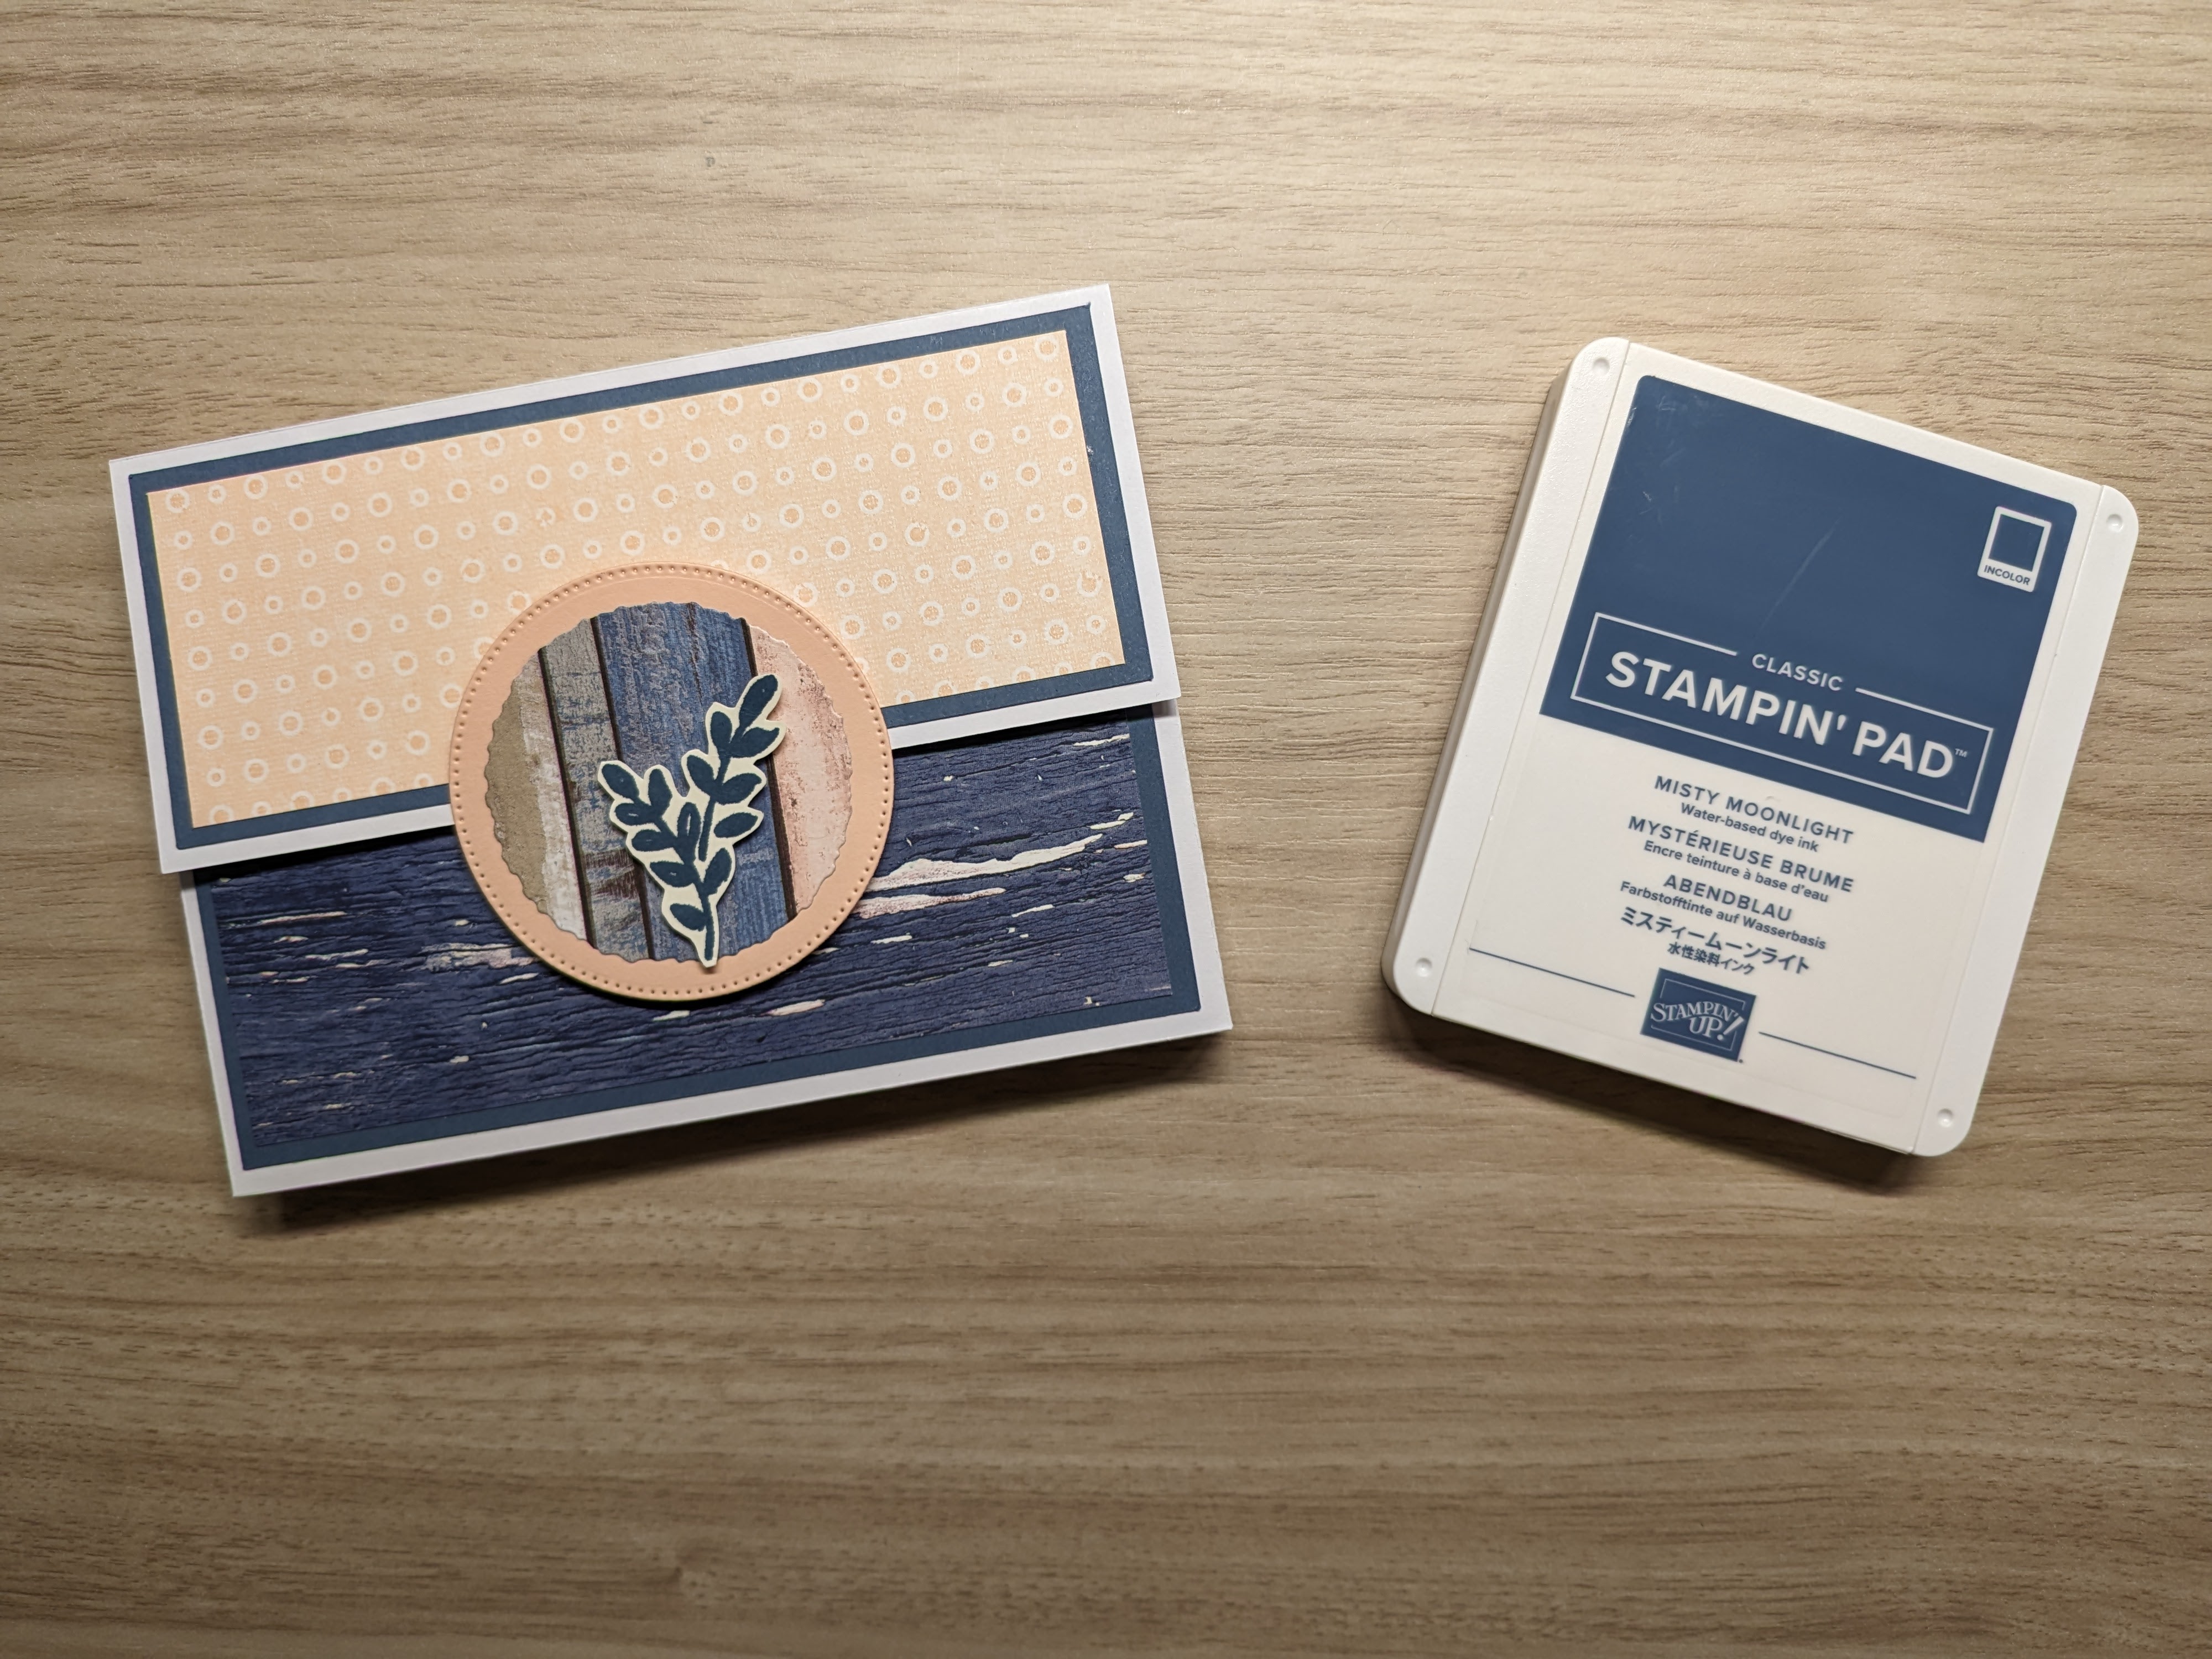
I constructed the box from a 12×12 piece of white card stock using my Cricut (dimensions and link to project below) and decorated it with the Petal Pink dots paper (2″ x 5 1/2″) from the Country Lace DSP set and the distressed wood paper in Misty Moonlight (2 1/2″ x 5 1/2″) from the Country Woods DSP set, both layered on Misty Moonlight card stock (2 1/4″ x 5 3/4″, 2 3/4″ x 5 3/4″). I then used Stampin’ Dimensionals to attach the Petal Pink circle to just the bottom half of the box, making it a sort of tab for the flap to slide under. I cut the circle using the second-largest circle from the Stylish Shapes die set and layered on a scrap of Country Woods DSP cut using the fourth smallest die from the Deckled Circles set. I topped it all off with a fussy-cut embellishment stamped from the Detailed Dogwood Stamp set. A hand-torn circle and any floral or foliage stamp would work just as well here!
Simply Marvelous
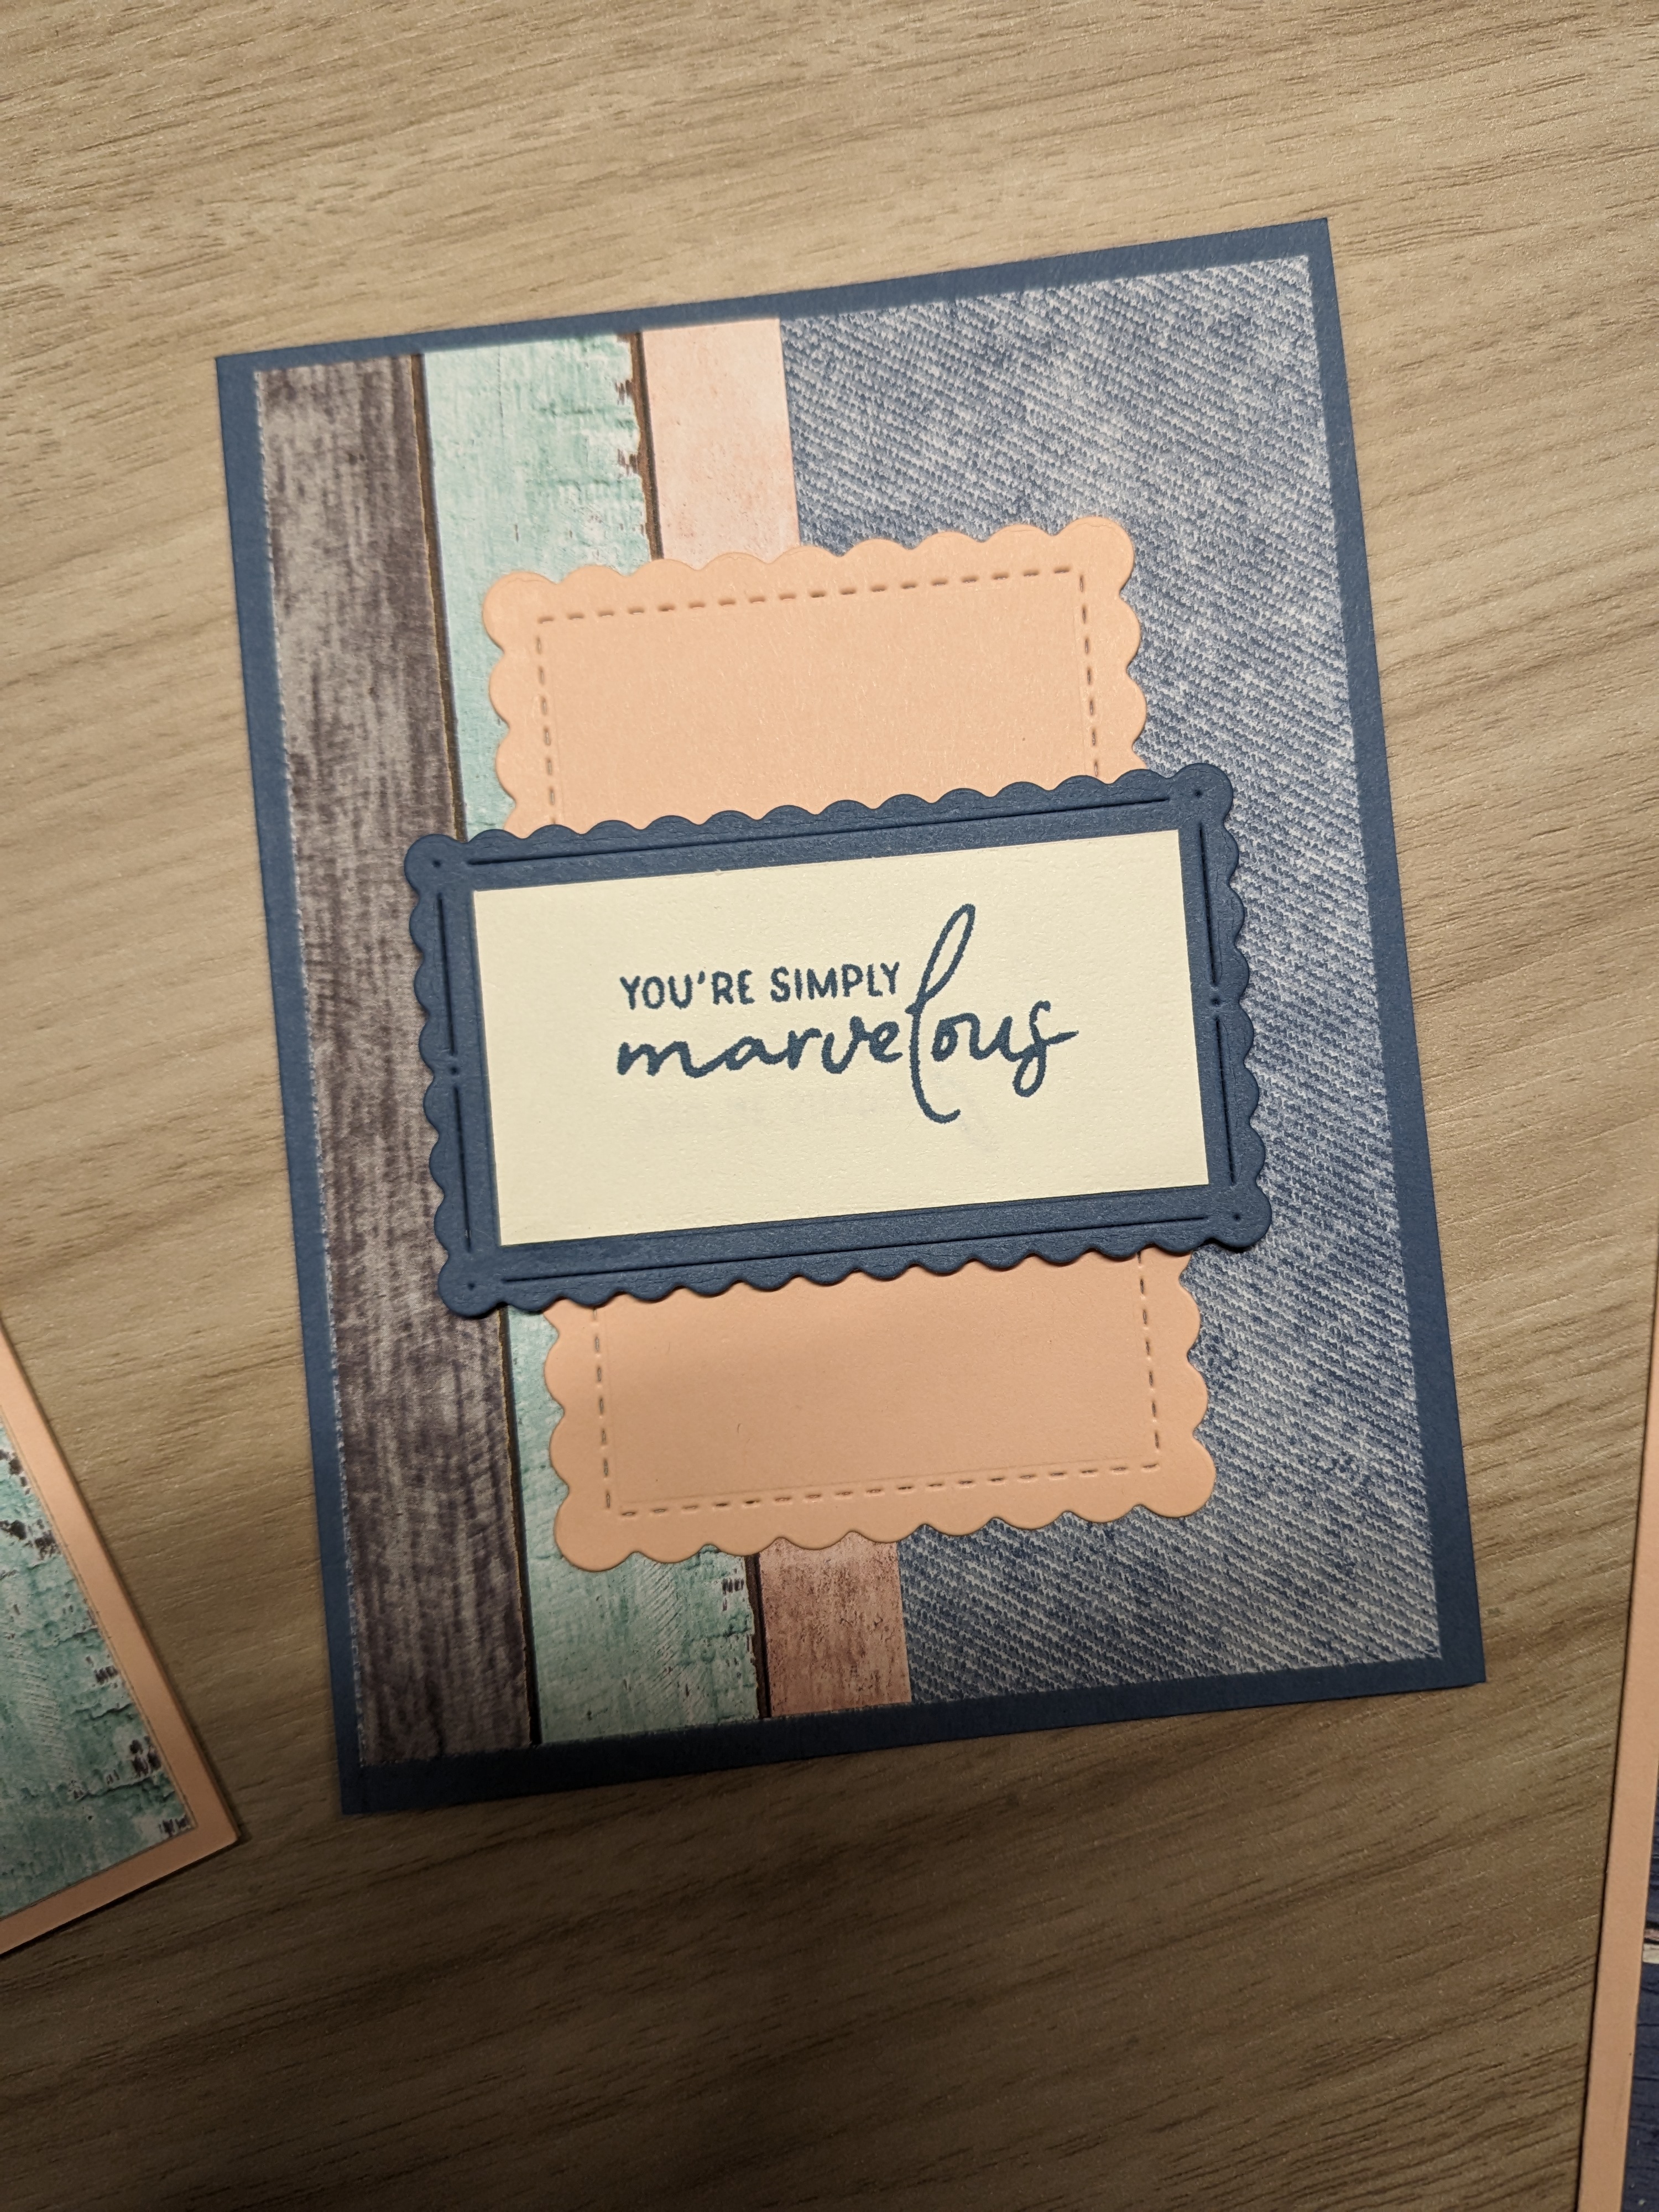
This is where my design brainstorm started. Like I said in the intro, I challenged myself to use the Country Woods DSP set…but just for one card. This one turned out so well that I decided to make the set!
I started with a Misty Moonlight card base (8 1/2″ x 5 1/2″, scored at 4 1/4″) and layered on the denim paper from Country Lace and the colorful wood panel paper from Country Woods. To create a seamless look, I cut the first to full size (4″ x 5 1/4″) and other to half (2″ x 5 1/4″). Any two complimentary (or contrasting!) papers would work for this design.
I stamped the Perennial Postage sentiment, “You’re simply marvelous” (don’t you just love that???), on top of three layers: the third-biggest die from Scalloped Contours in Petal Pink, the next smaller die from the same set in Misty Moonlight, and then a hand-trimmed layer in Very Vanilla*. This sentiment fits wonderfully inside the Misty Moonlight layer, measuring 1 5/16″ x 2 5/8″. I glued the first layer to the background and popped up the combined second and third layers with Dimensionals.
*Basic Beige would have been a better color for this, as it’s featured in the DSP, but I didn’t have it yet. If you don’t have Very Vanilla either, you could also use Basic White.
You Mean the World to Me
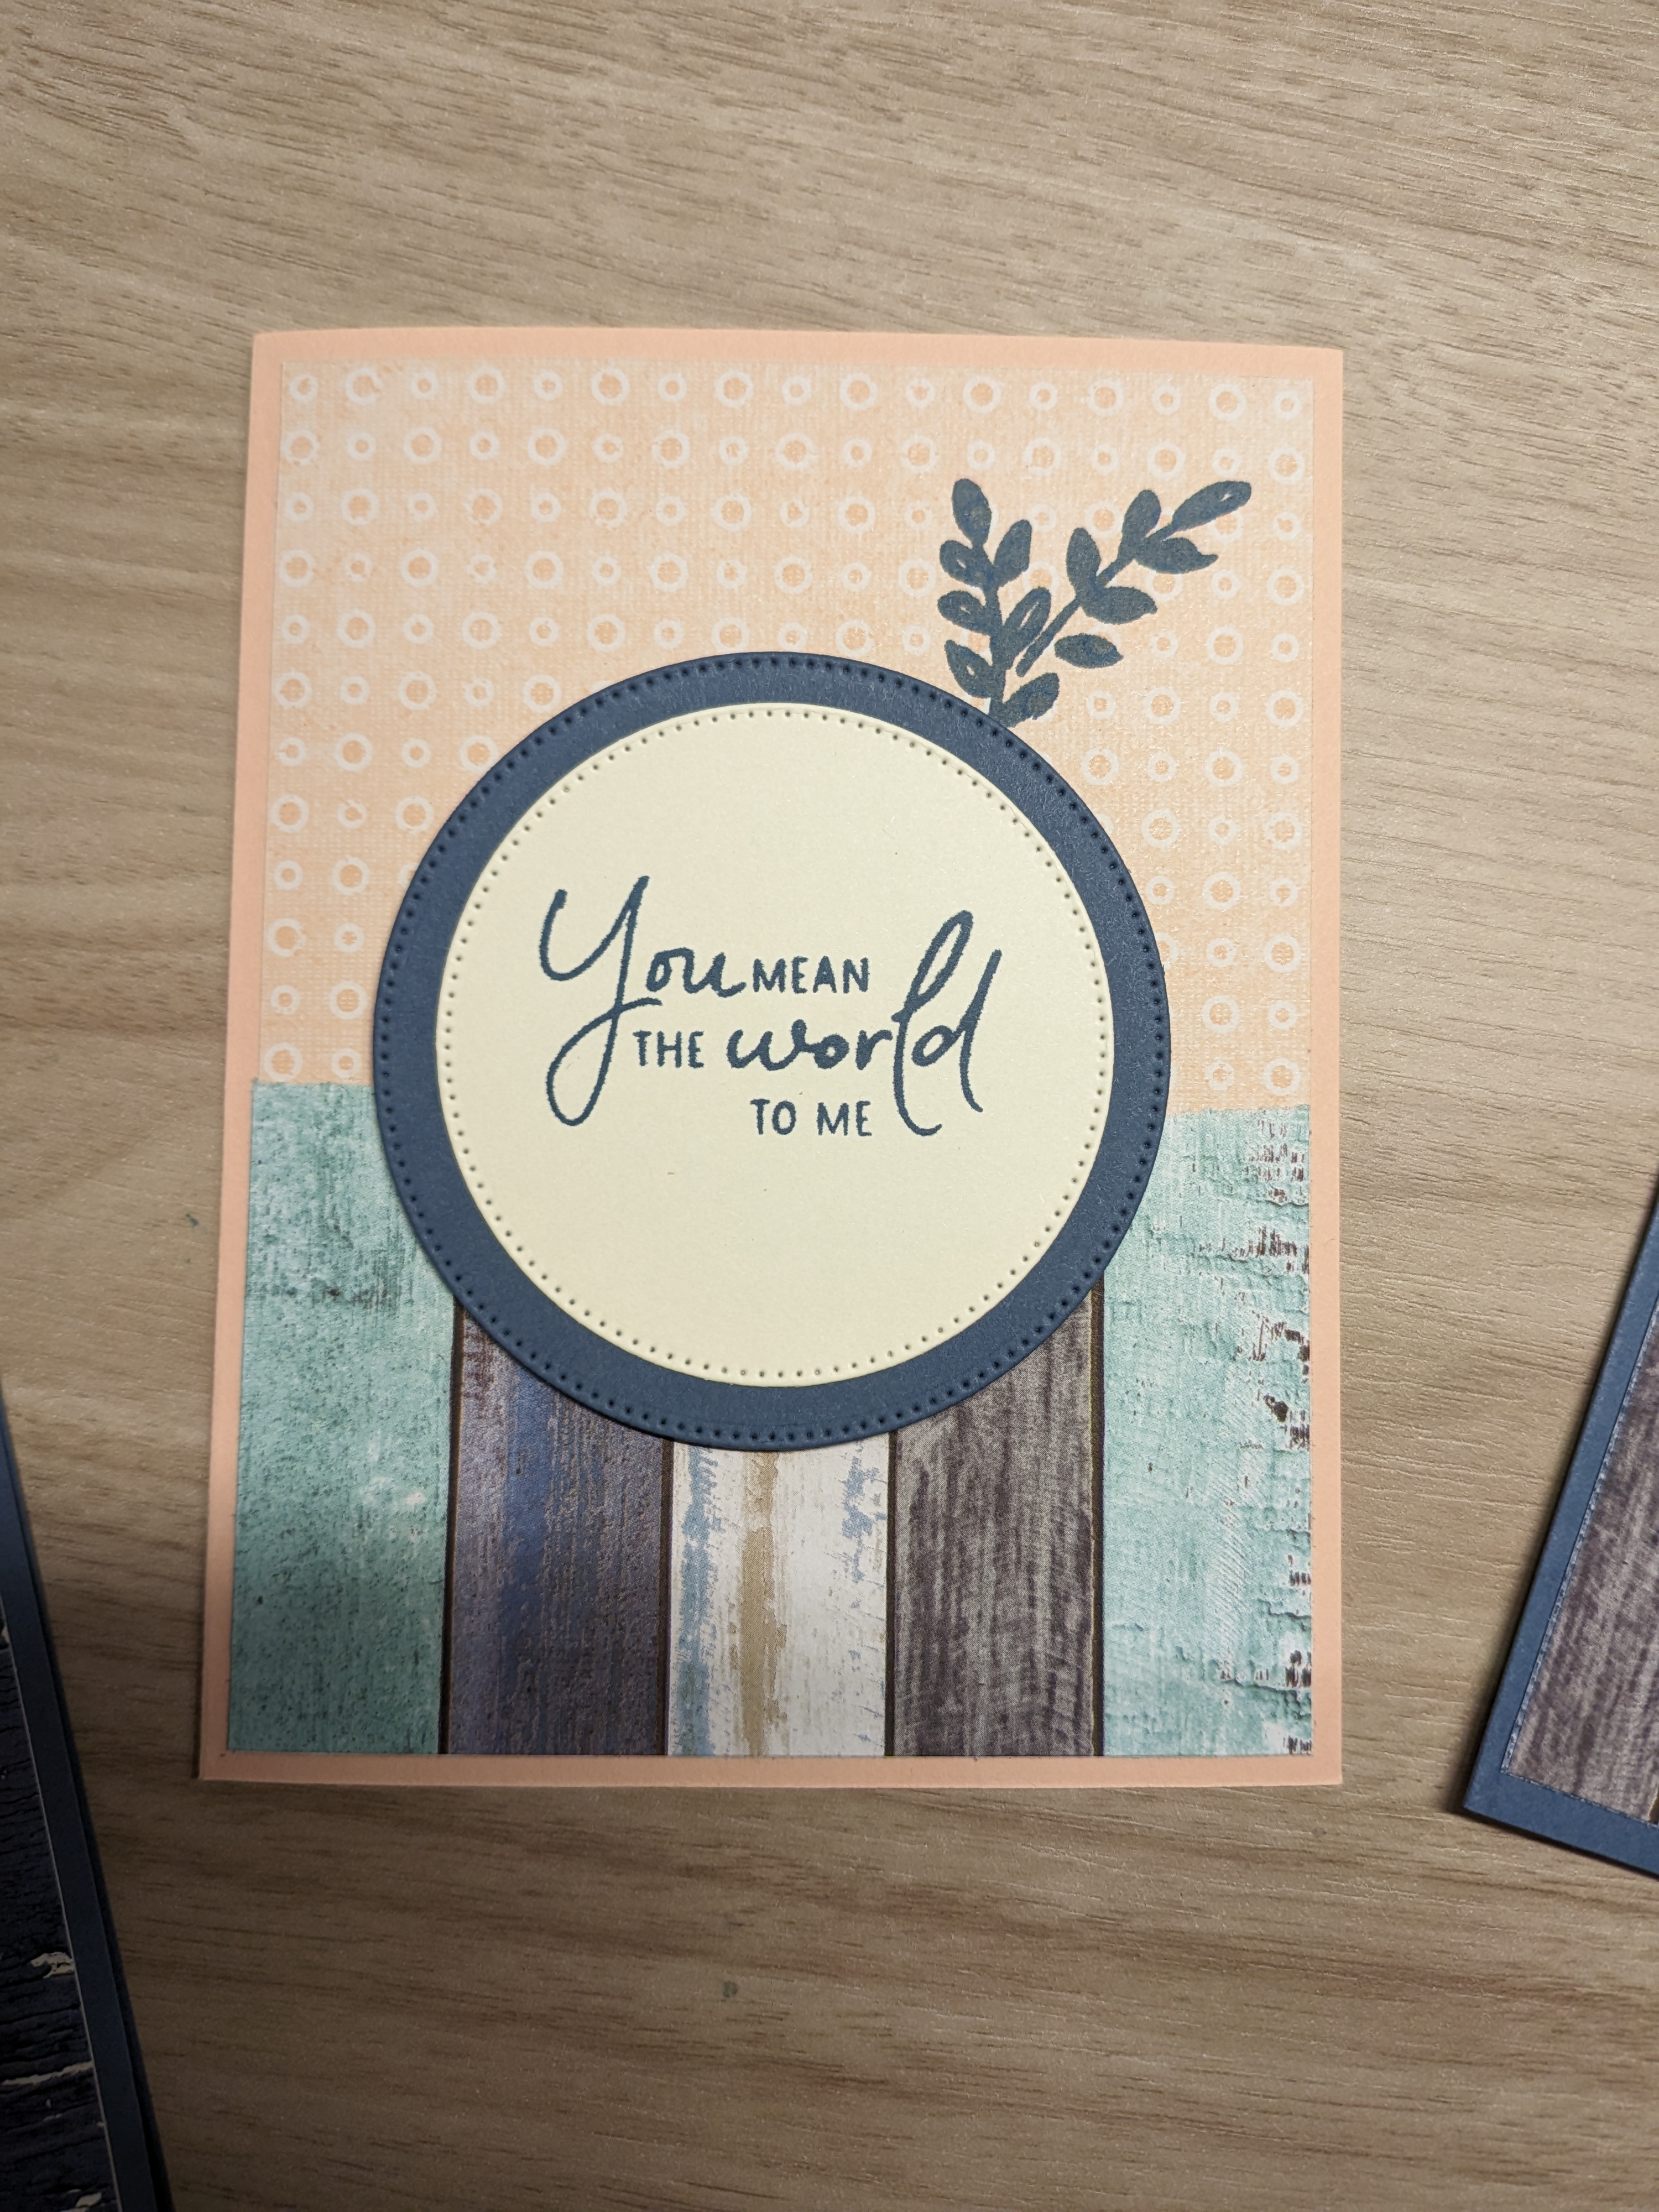
I wanted to keep working with the colorful wood panel paper for the second card, this time spanning the width of the card instead of the height. I didn’t want to re-use the clean cut of the first design, though, so I tried something NEW – I tore it! This was so much easier than I thought it would be: I pinched my fingers on either side of where I wanted to tear and kept them really close together as I moved down the page. I noticed two things in doing this: 1. The side facing you will turn out with a white edge, so tear it upside down; and 2. Longer tears work better, otherwise you end up with a weird torn AND scalloped edge – not what I was going for.
I used a standard Petal Pink card base and the same Petal Pink dots paper as on the box for the background (4″ x 5 1/4″). After I tore the wood panel DSP, I glued it on top of the background. I didn’t measure, but it’s about 2 1/2″ tall (a little less than half the height). Finally, I finished the background by stamping the foliage from Detailed Dogwood in the corner where I knew the sentiment would partially cover it. This was another new technique – I stamped directly onto the DSP!
For the sentiment, I chose “You mean the world to me” from Perennial Postage stamped in Misty Moonlight on Very Vanilla cardstock. I layered that on top of Misty Moonlight cardstock. I used the two biggest circles from Stylish Shapes to achieve the concentric layers. Once constructed, I popped this up on the background, approximately in the center covering a lot of my torn border (sad, I know; but it still looks good).
Can’t Thank You Enough
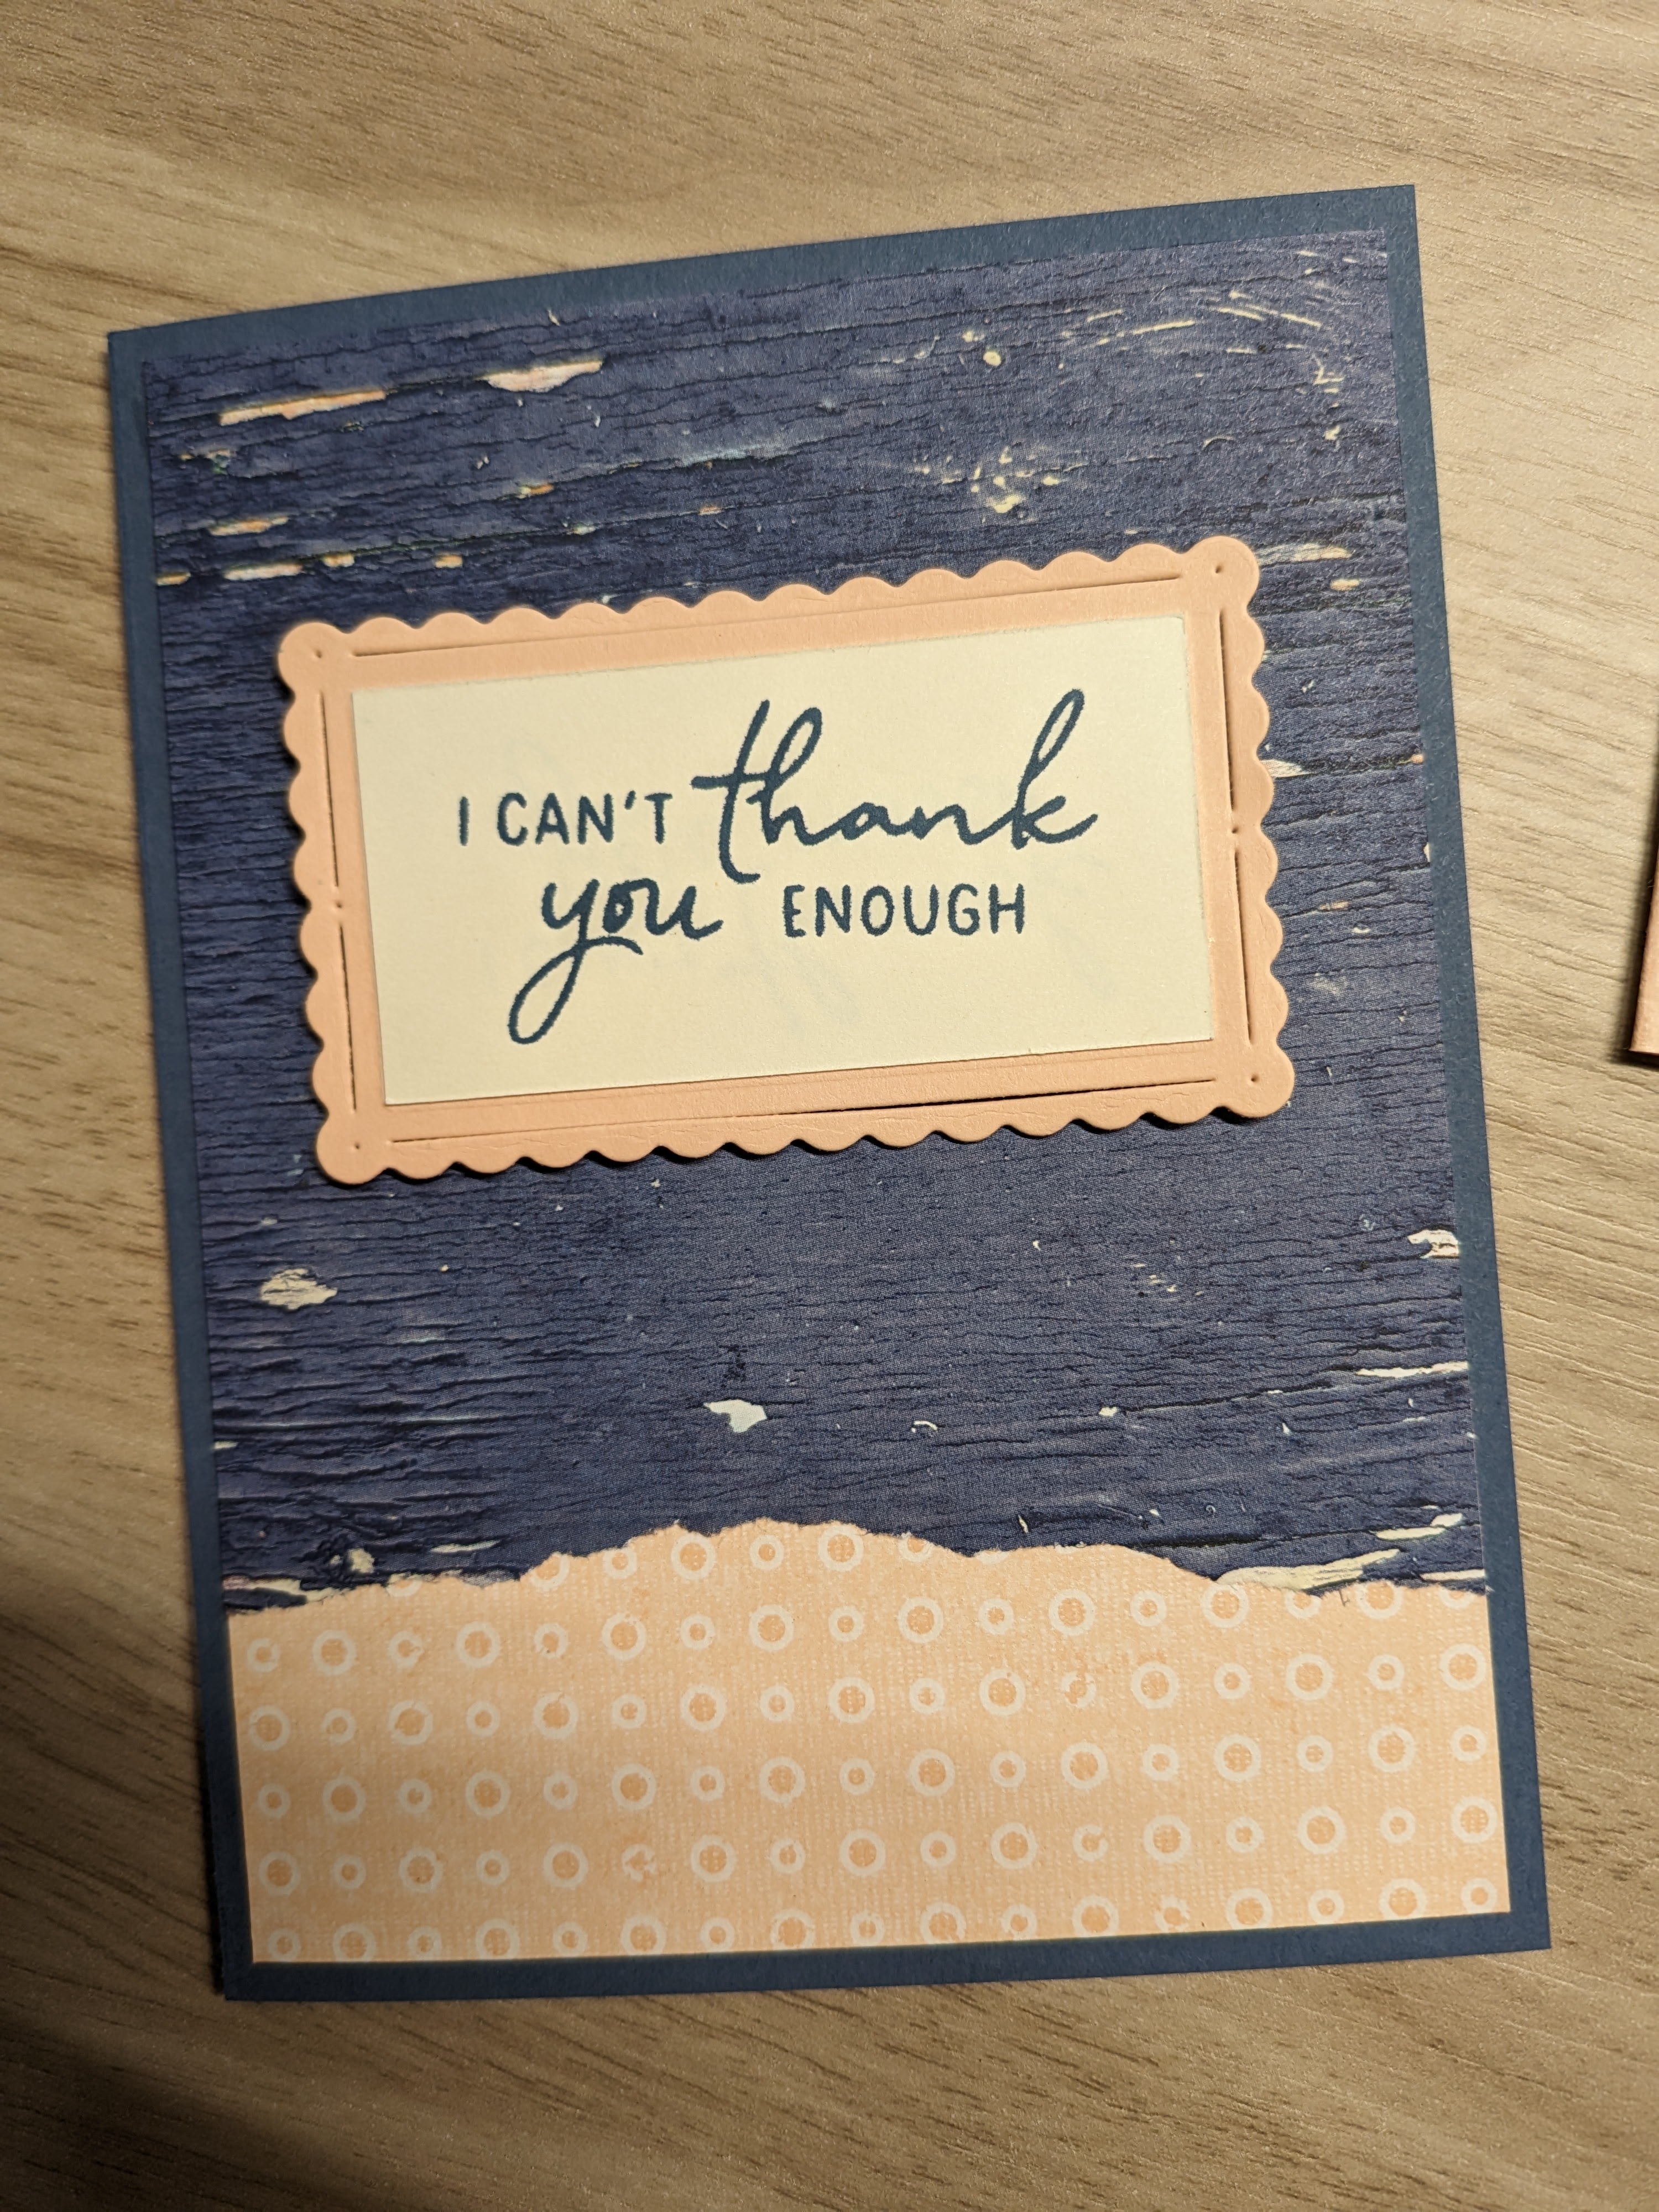
Remember that beautifully-torn DSP that I covered up on the second card? Well, I got to feature the reverse side here! The tear shows white on opposite faces of the paper on either side of the tear, so I used the front side of the bottom half for the first card (colorful stripes) and the back side of the top half for this card (distressed wood in Misty Moonlight). This time, I cut the torn paper long so it’s about two-thirds from the top of the border (around 4″ x 4 1/4″). Behind that is the Petal Pink dots paper from the box, cut to the full background size (4″ x 5 1/4″) for a seamless border.
I used the smaller Scalloped Contours die from the first card to cut a piece of Petal Pink for the sentiment. Just like for the first card, I hand-cut the sentiment layer in Very Vanilla. “I can’t thank you enough” also fits perfectly in this frame…even if you can’t stamp it straight.
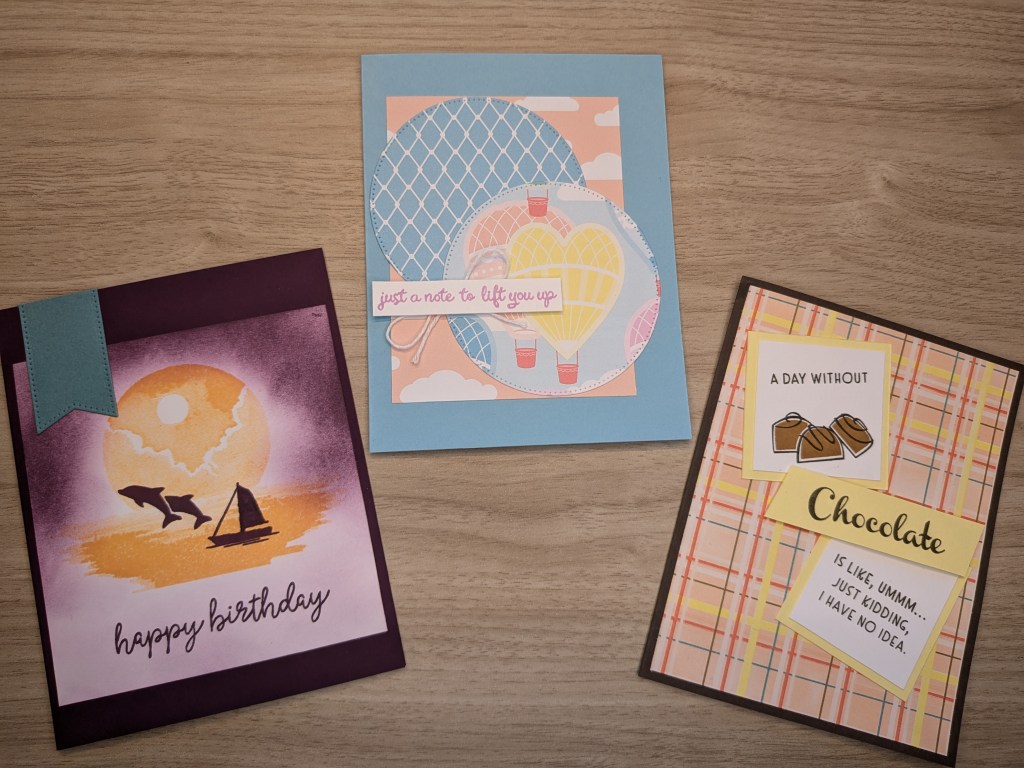
Happy Birthday
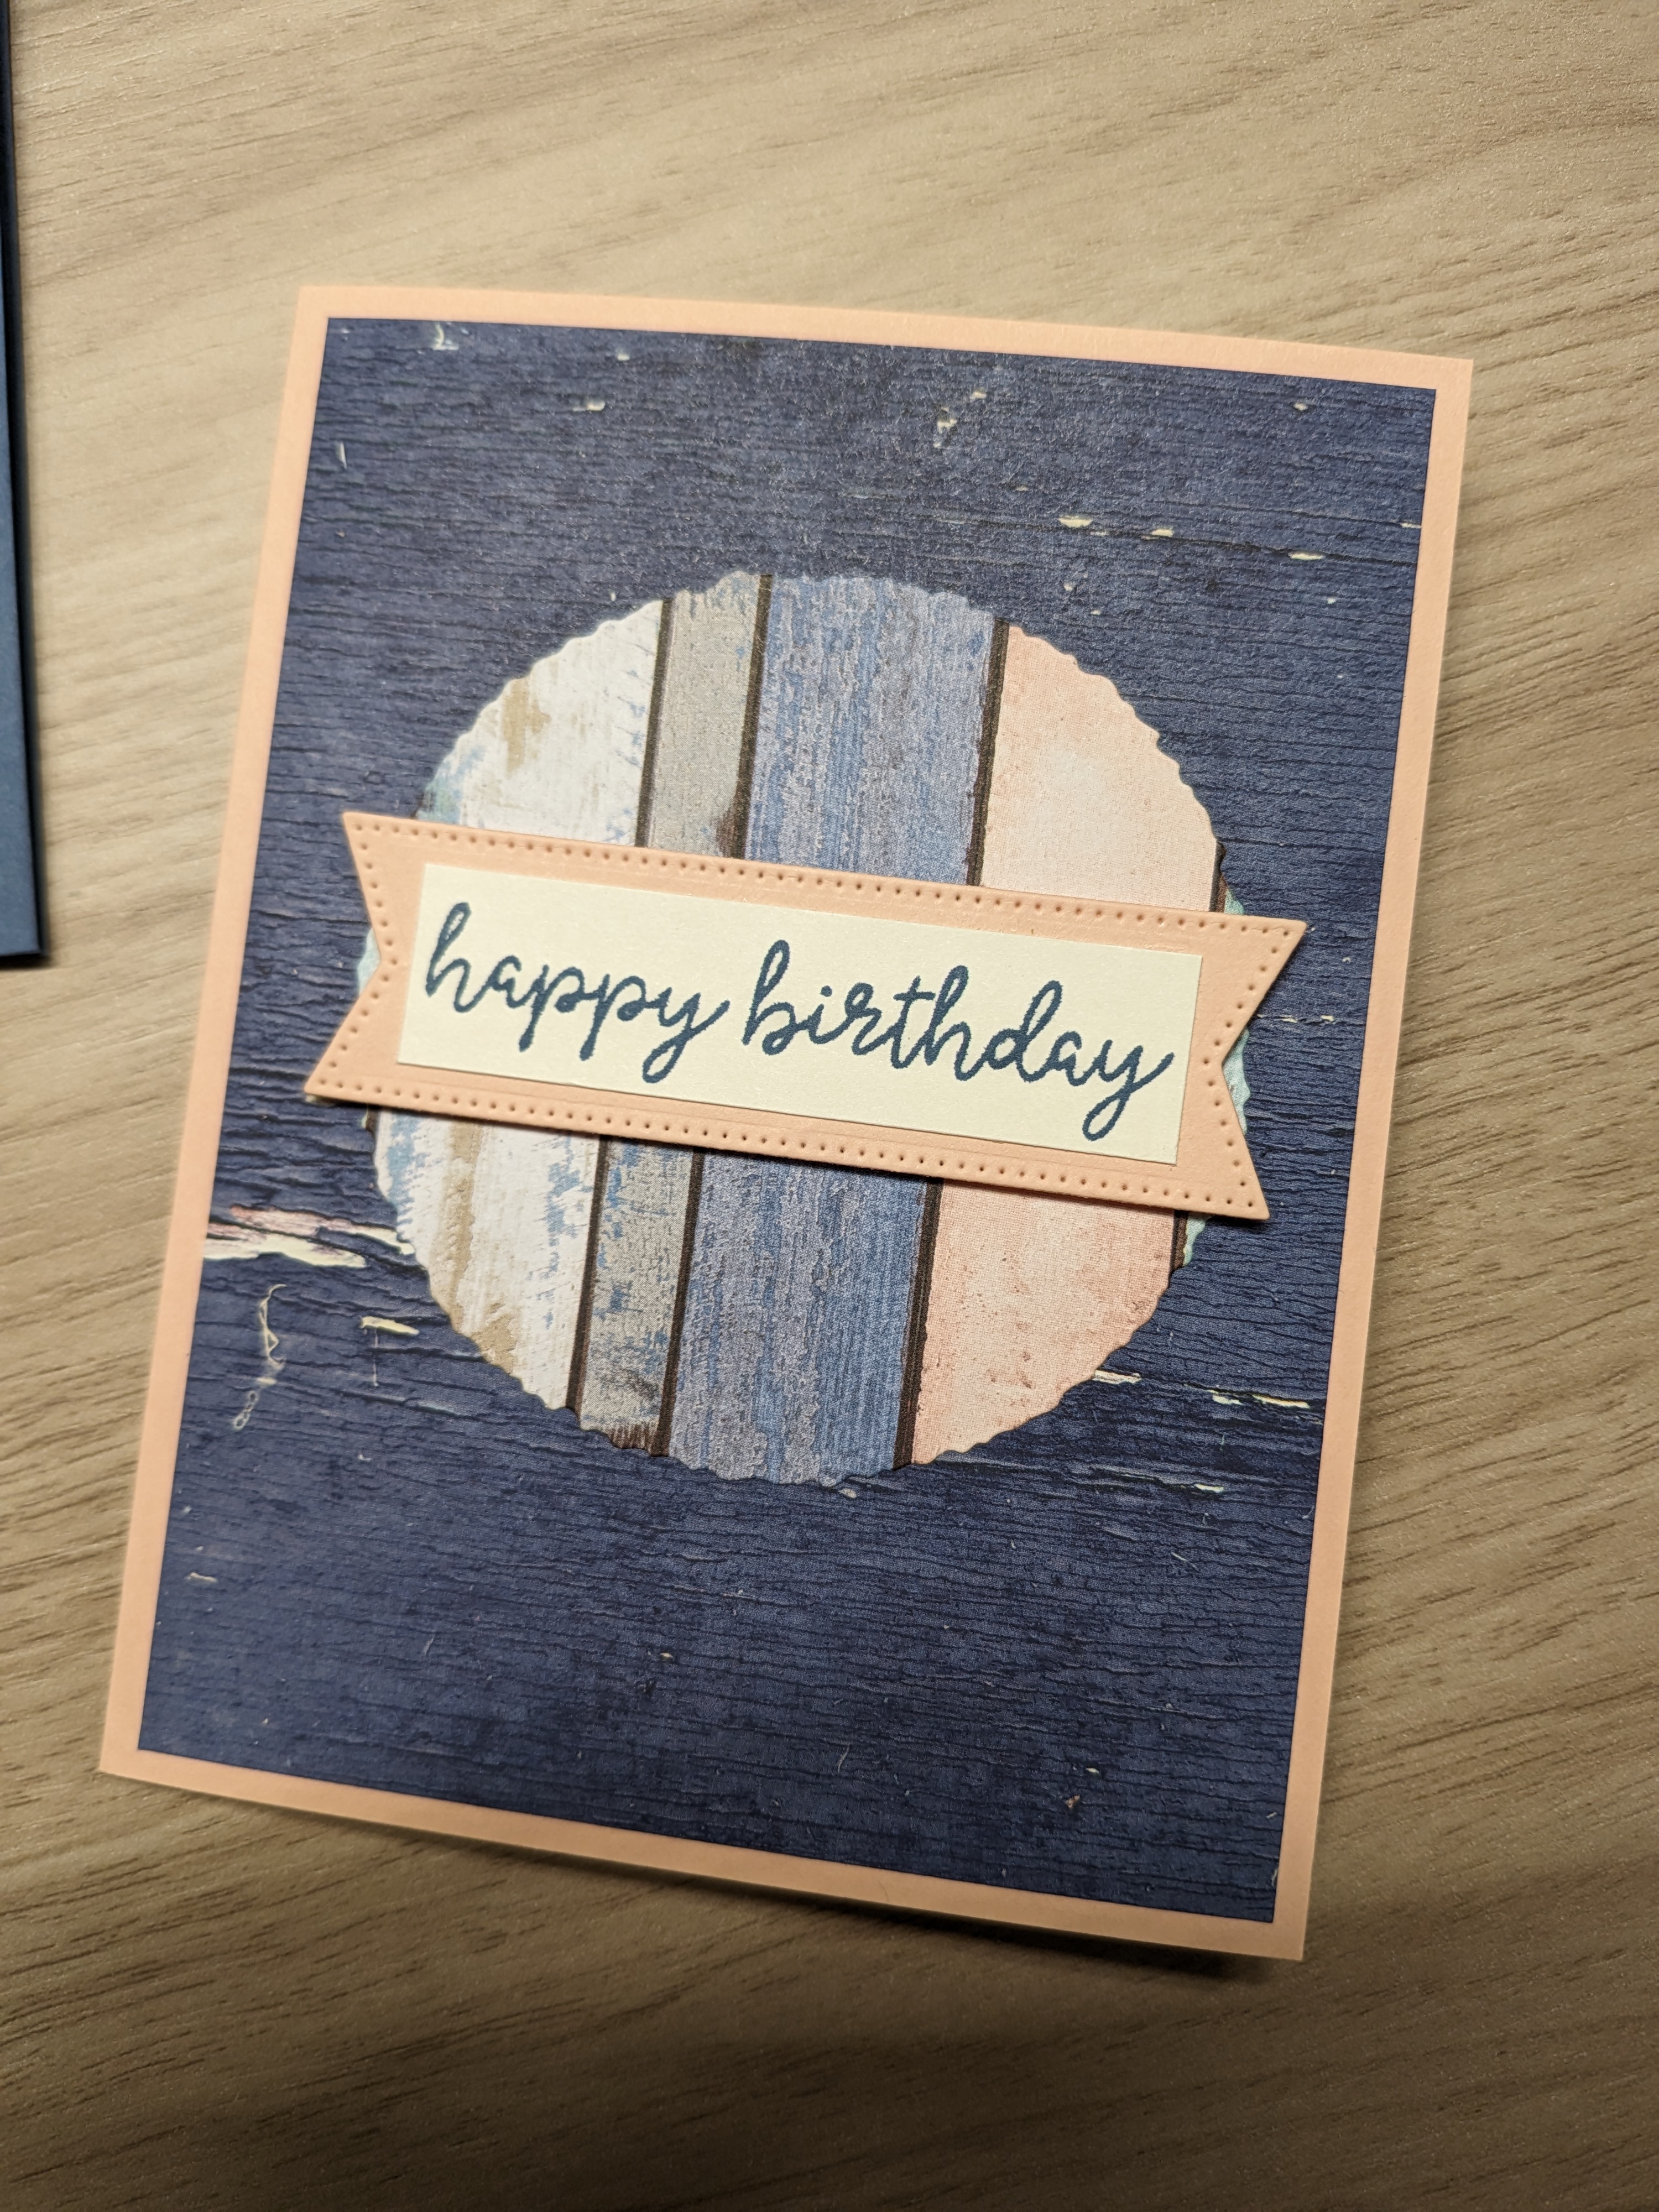
No mixed card set is complete without a birthday card, imo. Unfortunately, the Perennial Postage set doesn’t have a “happy birthday” stamp, so I had to go searching elsewhere in my collection. I found one in cursive in the Beach Day stamp set, and it seemed to fit well enough – much better than any of the others I had.
By this time, the torn-paper effect had really grown on me, so I decided to use the seventh smallest Deckled Circles die to cut the focal point. I wanted to tie everything together with elements from each of the other cards: a Petal Pink card base, the distressed wood background, and the torn effect on the colorful wood panels. I mimicked the framing effect I used for the Scalloped Contours rectangle inside of this Stylish Shapes banner. It’s the biggest one and the hand-cut sentiment layer measures 3/4″ x 2 3/4″.
Interiors
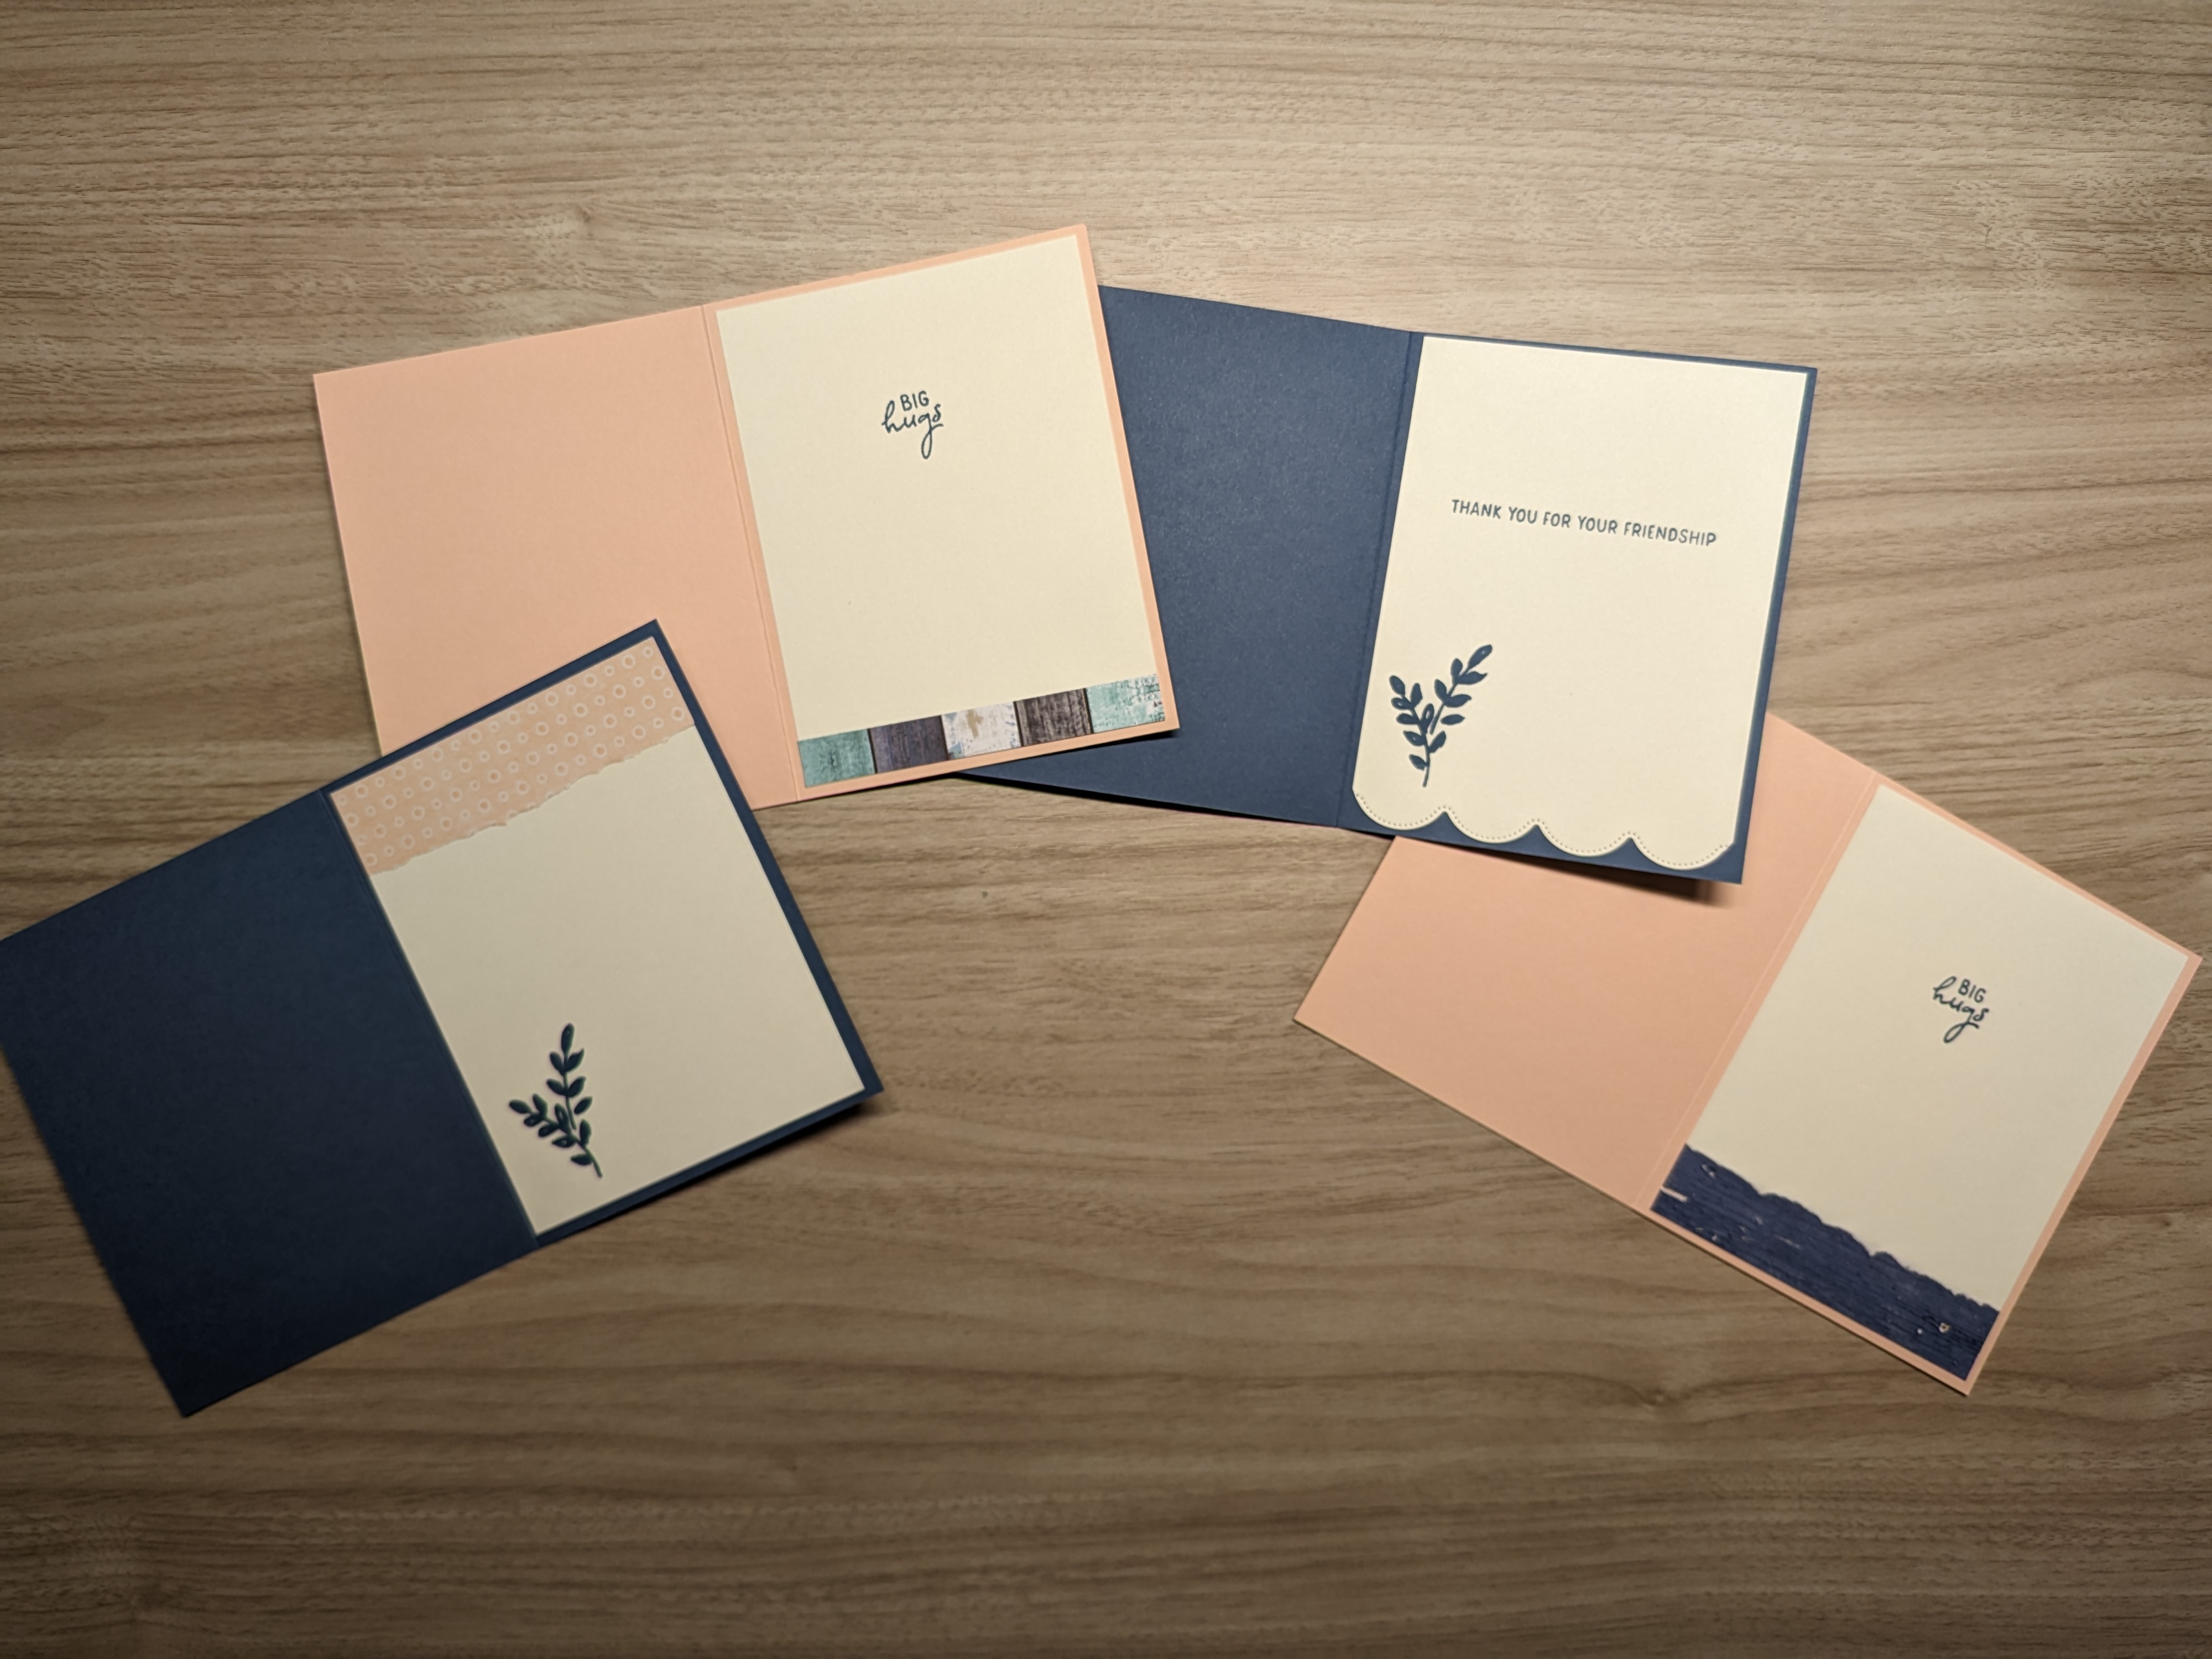
Interior 1 – Can’t Thank You Enough
Starting from the left, I kept the interior simple for our thank you card, leaving more space for a personalized message. Of course, I covered a good chunk of that space up with the foliage I had been using. It’s also got that top border (around 3/4″ torn from the dot paper), so I guess I didn’t leave much extra room at all. Oh well, it’s pretty, right?
Interior 2 – You Mean the World to Me
Second from the left, the interior for this card features a bottom border of DSP scrap and the Perennial Postage sentiment, “Big hugs,” in Misty Moonlight. The Very Vanilla insert and DSP border are 4″ wide. The insert is 5 1/4″ tall and the border measures about 3/4″.
Interior 3 – Simply Marvelous
Third from the left, I used a standard Very Vanilla insert (4″ x 5 1/4″) stamped with the Perennial Postage sentiment, “Thank you for your friendship,” and the foliage from Detailed Dogwood. I also trimmed the bottom of the insert with the long scalloped die from Scalloped Contours.
Interior 4 – Happy Birthday
“Big hugs” are back again in Misty Moonlight on top of a 4″ x 5 1/4″ Very Vanilla insert. The flourish on this one is a torn border at the bottom. I was able to use a pre-torn scrap because my tear for the second and third card fronts was much wider than I needed it to be. I didn’t measure, but it’s probably around 3/4″ tall.
Measurements and Supplies
Whether you read my narrative instructions or jumped here from the intro, you’re in the right place! Here’s a quick reference of measurements for the box and all four cards.
The Box
Like I said, I used my Cricut for the box. Here’s a link to that project: Card Box, by Margaret Berger. Using their diagram, I was able to infer these instructions.
- Start with an 8″ x 11″ piece of white cardstock.
- Score the long side at 1/2″ and 1″.
- Score the short side at 2 1/2″, 3″, 7 1/2″, and 8″.
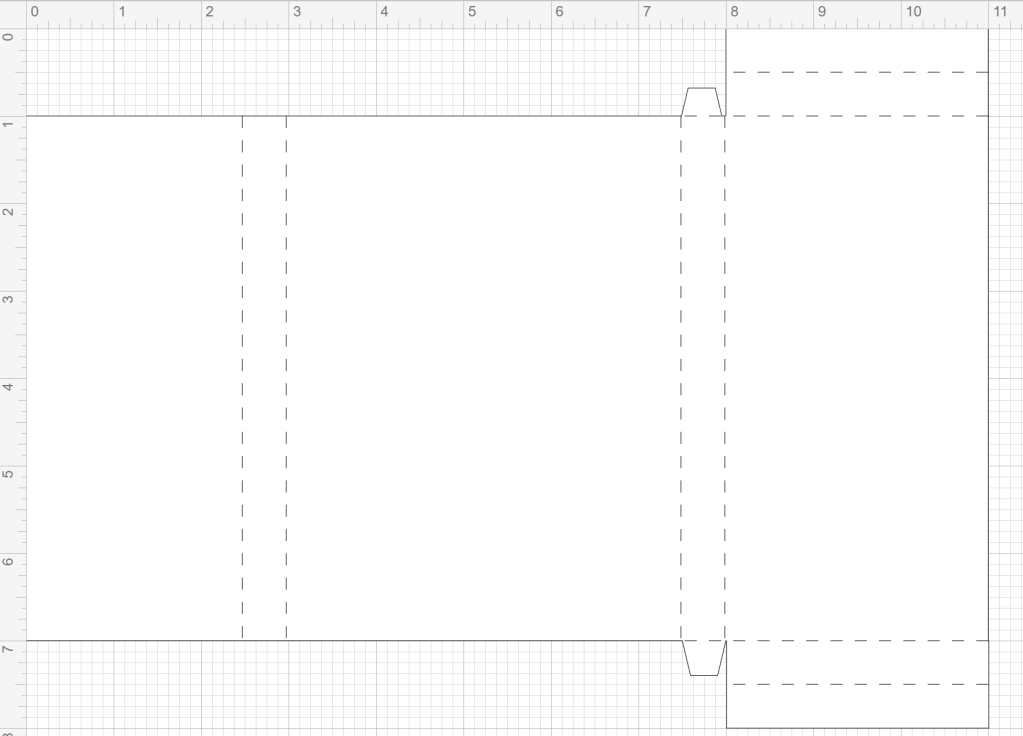
- With the long side on top and narrowest section on the left, remove all but the right-most section above the top score line. See diagram below.
- In the same orientation, remove all but the two right-most sections above the second score line.
- Cut down the right-most score line to the second horizontal score line. Miter the tab you just created to the left of this cut. See diagram below.
- Repeat this on the opposite (bottom) side. Note, you’ll need to mirror my instructions above if you rotate the paper. See diagram below for what the final sheet should look like.
- Burnish all the score lines inward.
- Glue the mitered tabs to the panel directly to their right according to the orientation shown in the diagram.
- Glue the panels extending from there to the back of the box (large rectangle section in the center). This will create a pocket.
- Fold the flap/cover down, covering about 1/4 of the bottom panel.
- Decorate using the paper and measurements shared above.
The Cards
Simply Marvelous
- Card base: Misty Moonlight, 8 1/2″ x 5 1/2″, scored at 4 1/4″
- Layer 1: Country Lace DSP, 4″ x 5 1/4″
- Layer 2: Country Woods DSP, 2″ x 5 1/4″
- Layer 3: Petal Pink card stock, third biggest Scalloped Contours die
- Popped layer: Misty Moonlight CS, fourth biggest Scalloped Contours die
- Sentiment layer: Very Vanilla CS, 1 5/16″ x 2 5/8″
- Interior panel: Very Vanilla CS, 4″ x 5 1/4″, trimmed with Scalloped Contours border die
You Mean the World to Me
- Card base: Petal Pink, 8 1/2″ x 5 1/2″, scored at 4 1/4″
- Layer 1: Country Lace DSP, 4″ x 5 1/4″
- Layer 2: Country Woods DSP, 4″ x (approx.) 2 1/2″ torn
- Popped layer: Misty Moonlight CS, biggest Stylish Shapes die
- Sentiment layer: Very Vanilla CS, second biggest Stylish Shapes die
- Interior panel: Very Vanilla CS, 4″ x 5 1/4″
- Bottom border (interior): Country Woods DSP, 4″ x 3/4″
I Can’t Thank You Enough
- Card base: Misty Moonlight, 8 1/2″ x 5 1/2″, scored at 4 1/4″
- Layer 1: Country Lace DSP, 4″ x 5 1/4″
- Layer 2: Country Woods DSP, 4″ x (approx.) 4 1/4″ torn
- Popped layer: Petal Pink CS, fourth biggest Scalloped Contours die
- Sentiment layer: Very Vanilla CS, 1 5/16″ x 2 5/8″
- Interior panel: Very Vanilla CS, 4″ x 5 1/4″
- Top border (interior): Country Lace DSP, 4″ x 1″
Happy Birthday
- Card base: Petal Pink, 8 1/2″ x 5 1/2″, scored at 4 1/4″
- Layer 1: Country Woods DSP, 4″ x 5 1/4″
- Layer 2: Country Woods DSP, seventh smallest Deckled Circles die
- Popped layer: Petal Pink CS, biggest Stylish Shapes banner die
- Sentiment layer: Very Vanilla CS, 3/4″ x 2 3/4″
- Interior panel: Very Vanilla CS, 4″ x 5 1/4″
- Bottom border (interior): Country Woods DSP, 4″ x (approx.) 3/4″ torn
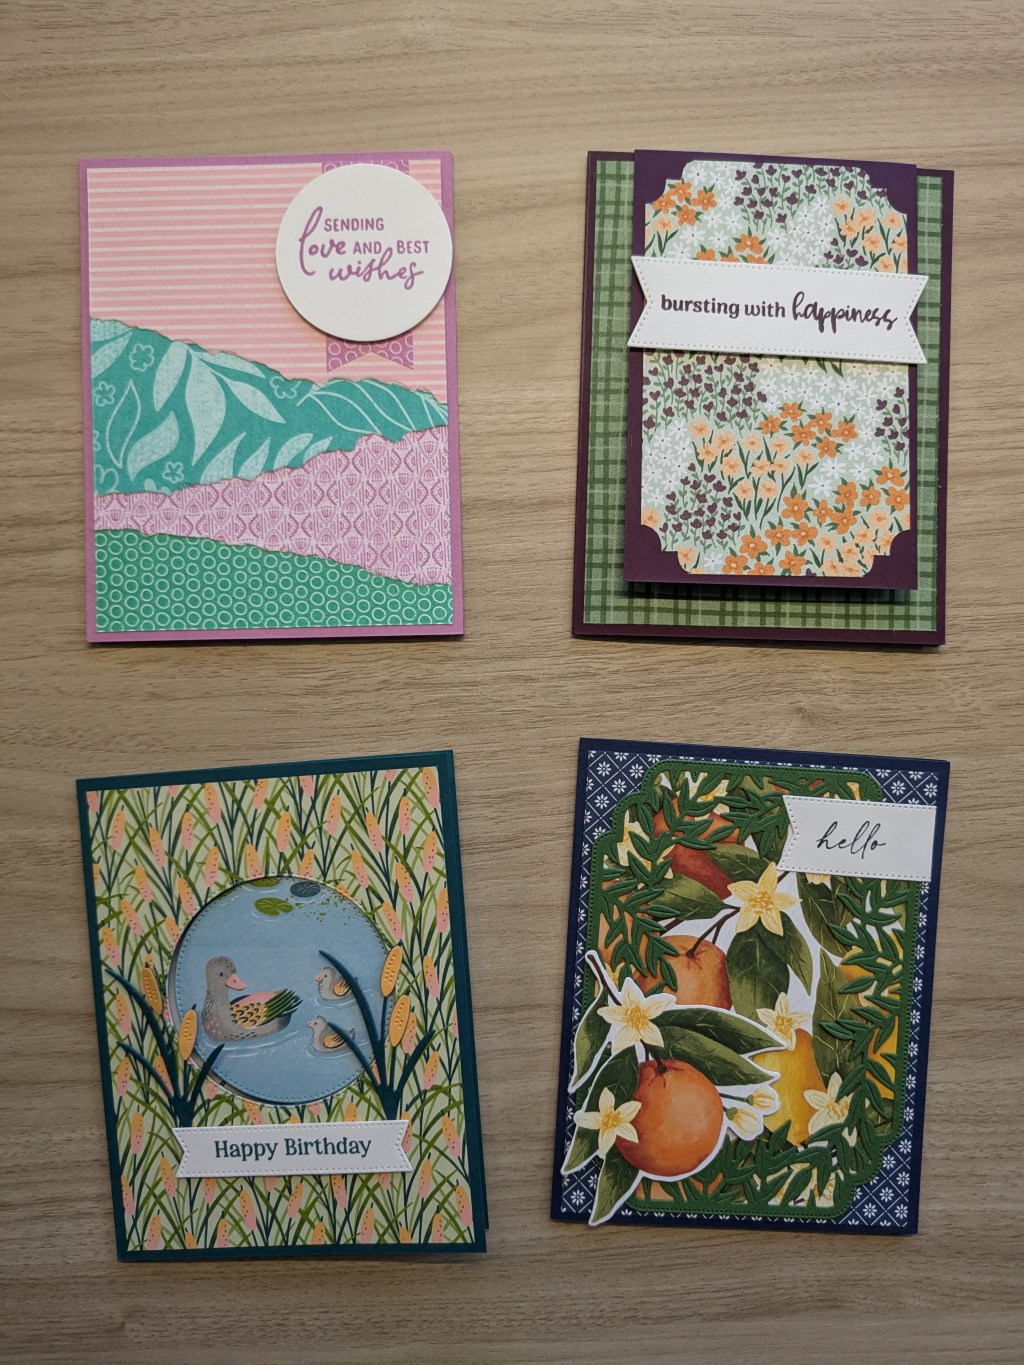
Finished Product
Closed Box and Misty Moonlight Classic Stampin’ Pad 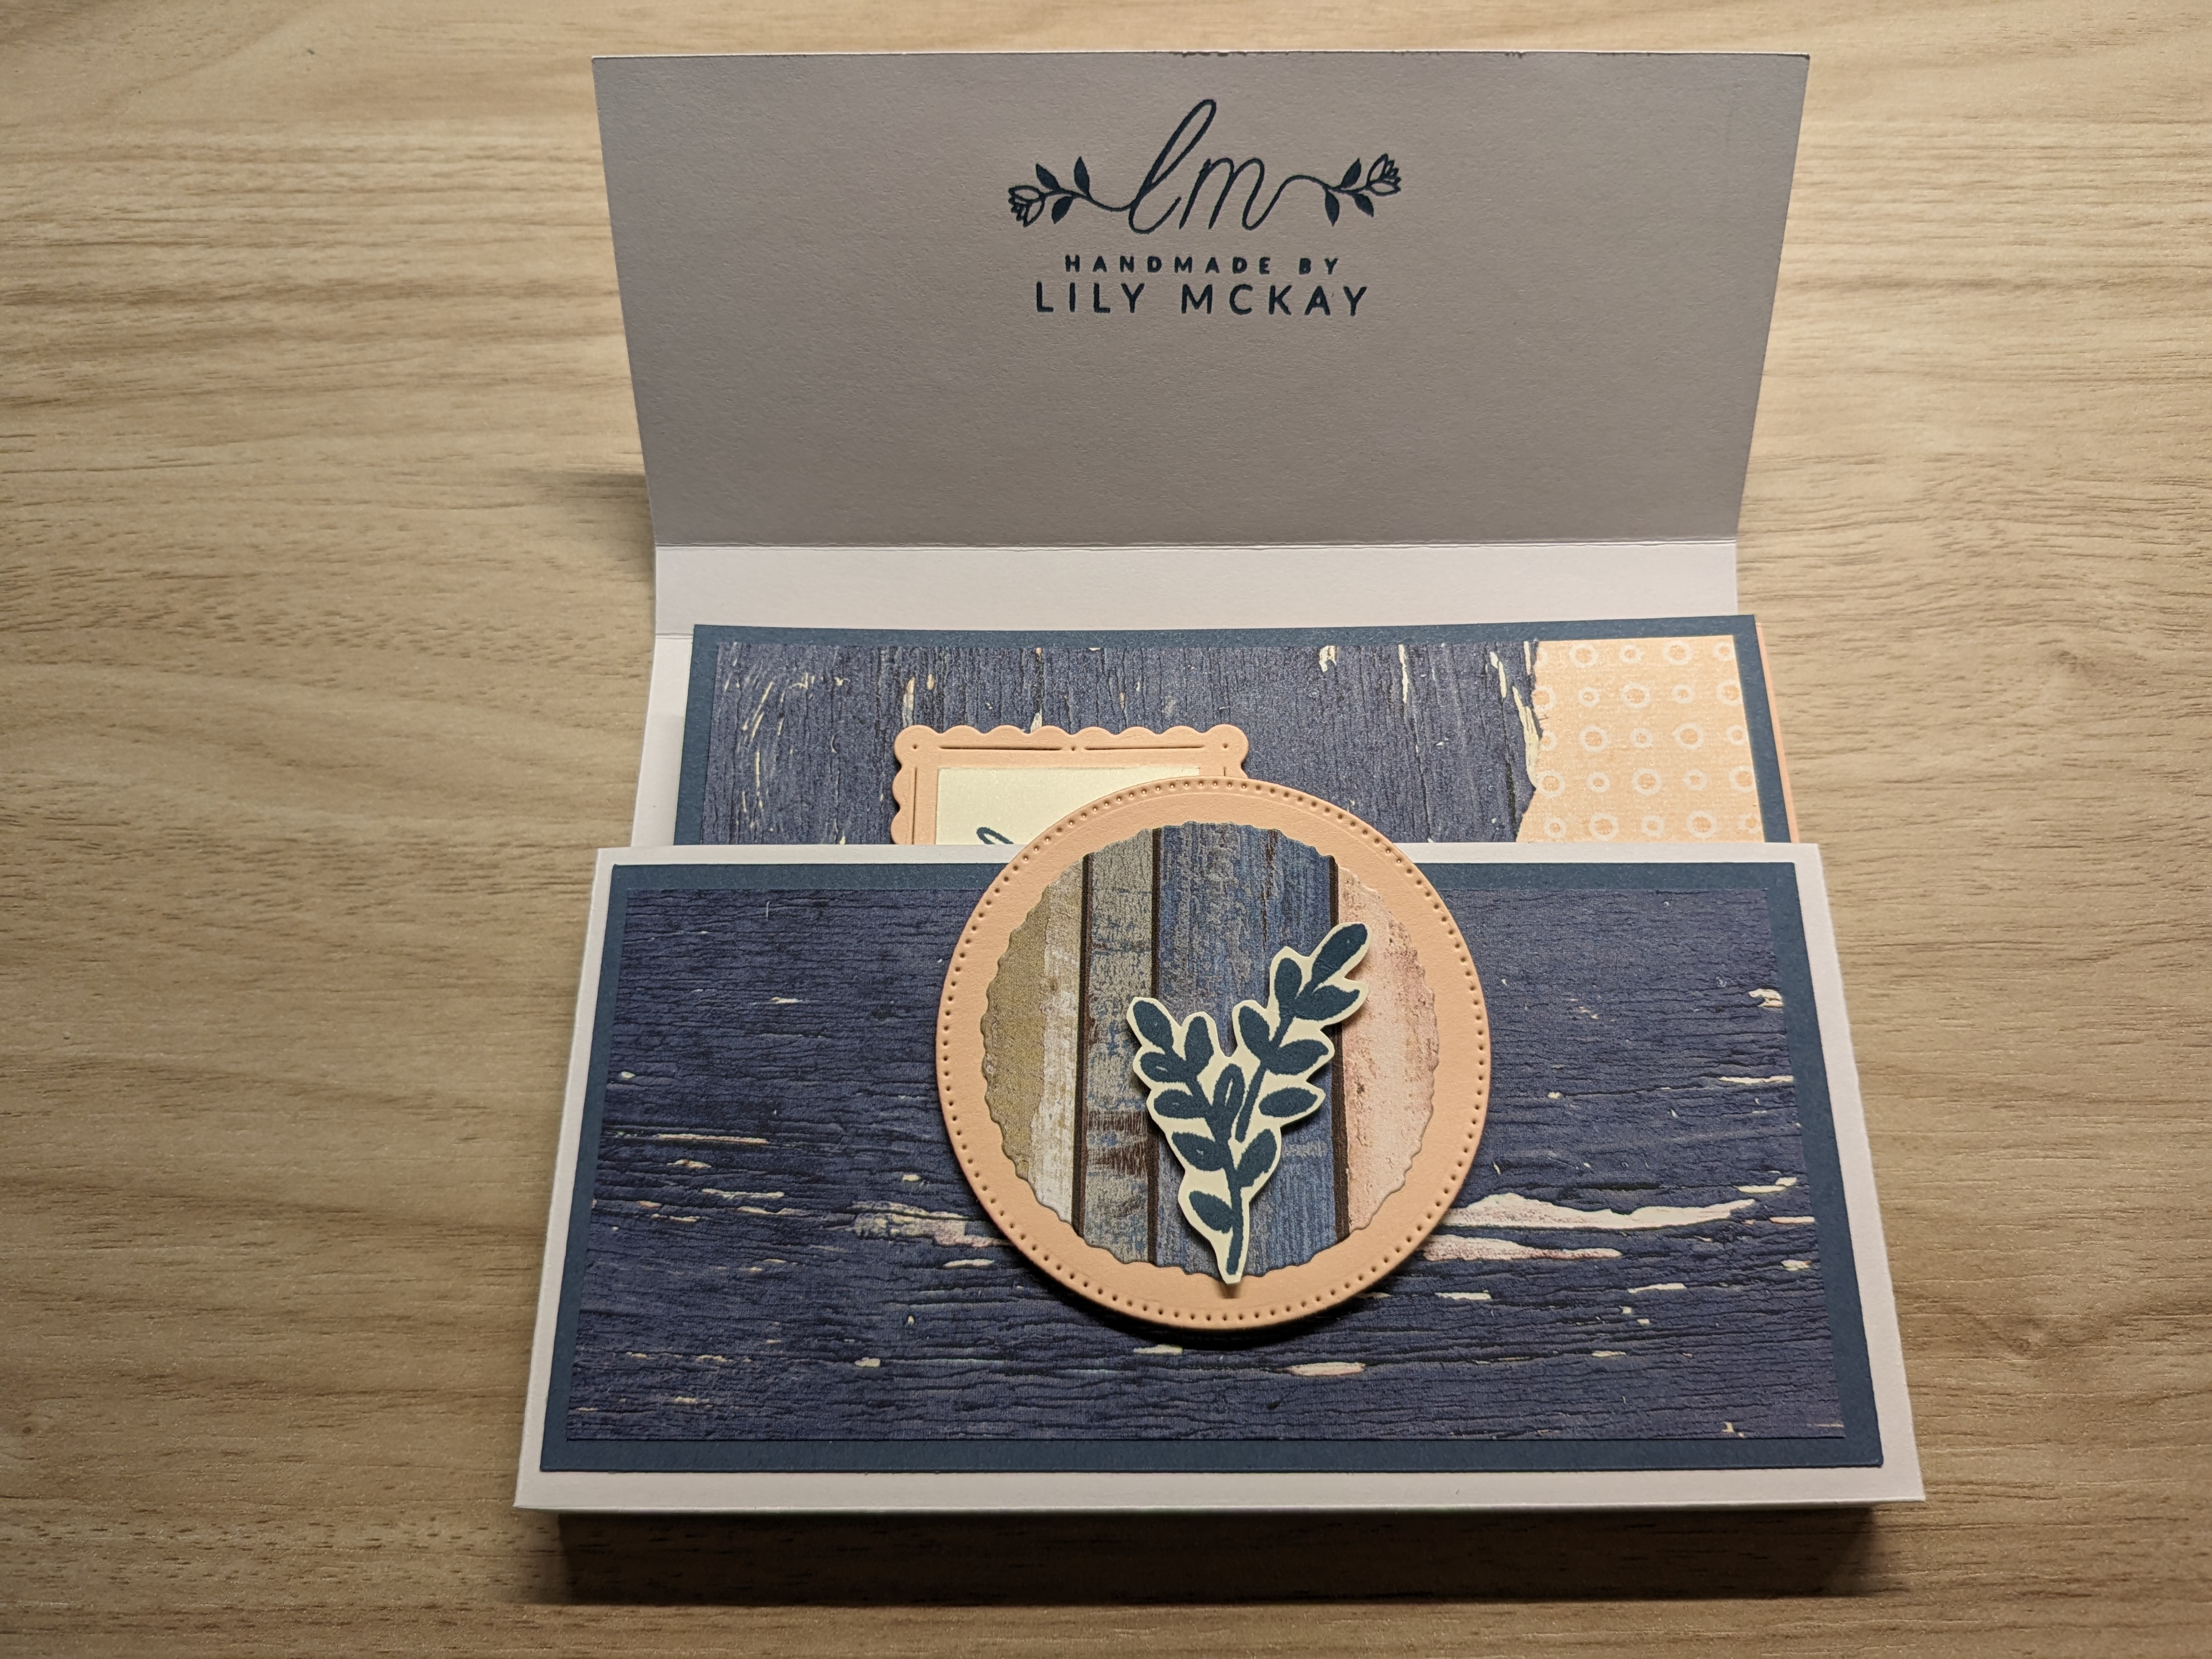
Open Box with Handmade by Lily McKay Stamped on the Flap Card 1: You’re Simply Marvelous Card 2: You Mean the World to Me Card 3: I Can’t Thank You Enough Card 4: Happy Birthday Card Interiors (LTR): Blank, Big Hugs, Thank You For Your Friendship, Big Hugs Full Set with Closed Box
I stamped all my cards and the inside of my box with my maker’s mark. I’m not selling these yet, so you won’t see the Stampin’ Up copyright. (It’s on its way to me, though!) The box holds all four cards, plus envelopes. If you want to take things up a notch, use whatever foliage stamp you used for the cards and box to stamp the front of each envelope. Nothing like a cohesive set!
Thanks for making these with me. Check back again for more tutorials on Handmade by Lily McKay.


Leave a comment