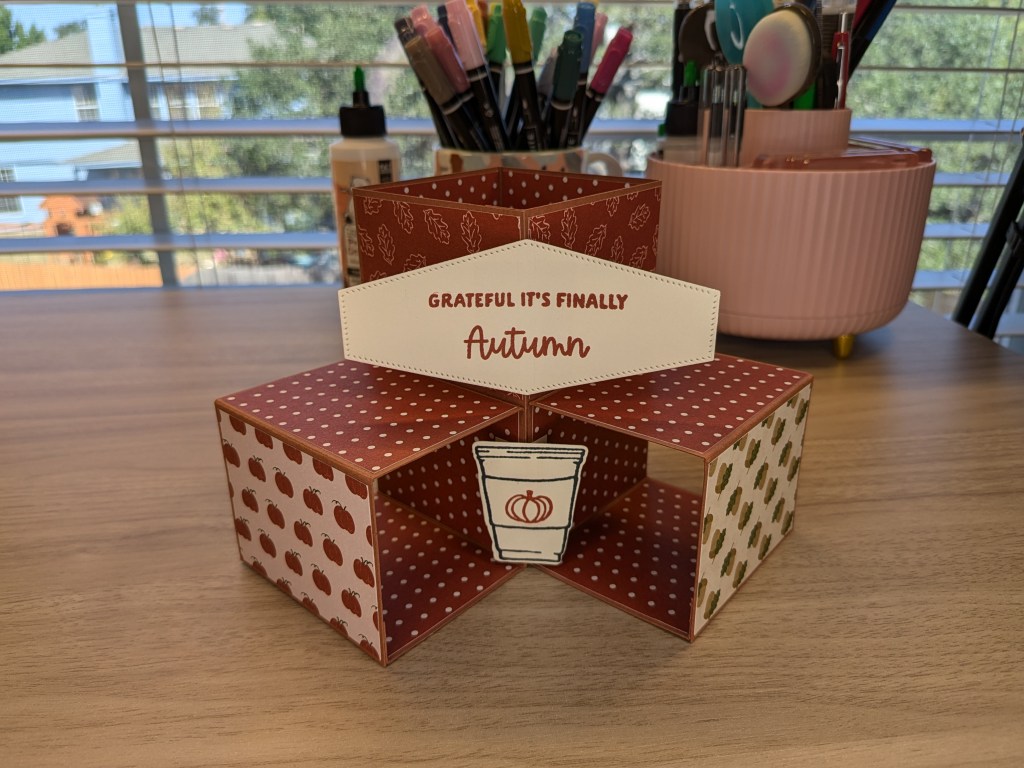
This was such a great card to make! After watching many tutorials that resulted in 6″ x 6″ cards, most of which have a gap between the front that folds up and the back pillar of the card, I altered the measurements to eliminate the gap and fold into a 4 1/4″ x 5 1/2″ card. Let’s take a look!

Materials Used
Here are the materials I used for this card.
- Copper Clay and Very Vanilla cardstock
- Cajun Craze ink
- More Than Autumn stamps and dies
- Greetings of the Season and Nested Essentials dies
- Very Vanilla ribbon
Detailed Instructions
Here are all the steps I took making this card.
Grateful it’s Finally Autumn
Measurements
- Card base (pillar): Copper Clay cardstock, 4 1/4″ x 11 1/2″, scored at 2 3/4″, 5 1/2″, 8 1/4″, and 11″
- Card base (cubes, x2): Copper Clay cardstock, 9″ x 2 3/4″, scored at 2 1/8″, 4 1/4″, 6 3/8″, 8 1/2″
- Inside pillar layer: Splendid Autumn DSP, 2 5/8″
 x 4 1/8″ (h)
 - Cube layers (4x front, 4x inside, 2x top, 2x bottom*): 2 5/8″ x 2″ (h)
- Back panels (x2): Very Vanilla cardstock, 2 5/8″ x 4 1/8″
- Floating mechanism (x4): Very Vanilla cardstock, 1″ x 1″, scored at 1/2″
- Scraps for die cuts
*I used cardstock for the bottom layers (hidden when open, displayed on the bottom half when closed). Most of the tutorials I watched didn’t put anything at all in those spots and I also considered using DSP instead, so you can get creative with it!
Instructions
I want to take you through this one step by step. It was a little tricky to figure out, but after I had all the measurements right, it ended up being pretty straightforward. Please comment if you have any questions or I made any mistakes.
But first! Here are a few upfront pointers based on some things I learned making this.
- Adhere all the inside layers before constructing the card base. Since it folds flat, you can adhere the outside layers afterwards to ensure the most precise placement.
- Use the same color paper for the sentiment/coffee cup and the “floating” mechanism to avoid the latter showing through the former.
- Adhere the mechanism to the card base before adhering the DSP layers. That way, the mechanism is as hidden as possible.
Now onto the steps:
- Cut and score the card base pieces. Each should fold into a 3D square with 1/2″ tabs to close them.
- Cut, score, and adhere a mechanism piece to each small base piece. I adhered these to the second panel, mirrored so they face each other once constructed. Only adhere one half of the mechanism to the base. The other should “float” to hold the coffee cup.
- Adhere the inside DSP layers before constructing the card base. I adhered these to the middle two panels of each base piece. DSP should appear in the inside back of the tall pillar and the inside top and bottom of the smaller cubes (one of which should cover the adhered part of the mechanism on each).
- Construct the card base. First, close all the squares using the tabs provided, and then adhere the two cubes to the bottom front of the tall pillar. Make sure your inside panels show as described above.
- Cut, score, and adhere the other two mechanism pieces to the top front of the tall pillar. Again, adhere just one side of the mechanism and mirror the floating pieces so they face each other.
- Adhere the outside DSP layers. The card will fold flat to do this. Fold the cubes up and down accordingly and fold the card flat to adhere remaining panels to the tall pillar. If you want to stamp a sentiment to one of the back layers, do this before adhering it. Here are the layers I used:
- Neutral patterns (dots) for the inside layers and tops of the cubes.
- Graphic patterns (pumpkins, acorns, and leaves) for the front-facing layers.
- Very Vanilla cardstock for the back (tall) and bottom (squarish) layers. For the bottom, I stamped my own patterns using the pumpkin pie and pumpkin stamps from the More Than Autumn set. These layers will show only when the card is closed.
- Stamp, die cut, and adhere the sentiment and coffee cup. These attach to the floating mechanism pieces with the flaps folded out from each other. This creates a flat surface to adhere the pieces to.
- Fold the card and add the ribbon. This isn’t entirely necessary, as the envelope will also keep your card folded. Alternatively, you could use a belly band, which some demonstrators have used instead of the bottom cardstock layers mentioned above.
What’s Next
It’s about time to start transitioning to holiday cards! I have a lot of people on my list, so hopefully I’ll be able to share lots of ideas in the coming weeks.
Thanks for stopping by. See you next time!


Leave a comment